Create a rule
To create a rule, you use the Rule Designer.
Before you begin to create a rule, you must determine what the purpose of the rule is to be. Although rules can be applied to both Expense and Time entries, more than likely the rule will be function specific.
To create a rule:
-
Select Tools > Rule Designer from the banner at the top of the My Time or My Expense window.

-
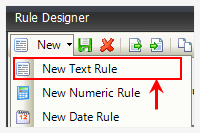
Click the New button arrow in the toolbar, and select the type of rule you want to create.
Just clicking the New button as opposed to its arrow defaults to a 'New Text Rule.'

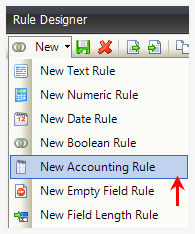
Available types are:
New Text Rule - This rule can be used to assure that certain verbiage is included or excluded from entries. For example:
- Never use the abbreviation "TC" in a narrative. Spell out the phrase "telephone conference."
- Always include the word "Insurance" when the word "Adjustor" is used in the narrative.
- Do not use the $ symbol in any narrative.
If your firm needs to enforce these types of rules as firm policy or via a client mandate, establishing a Text Rule can ensure that rules are automatically enforced.
 To create a Text Rule
-
Select New Text Rule from the New list.
A Text Rule window opens.

-
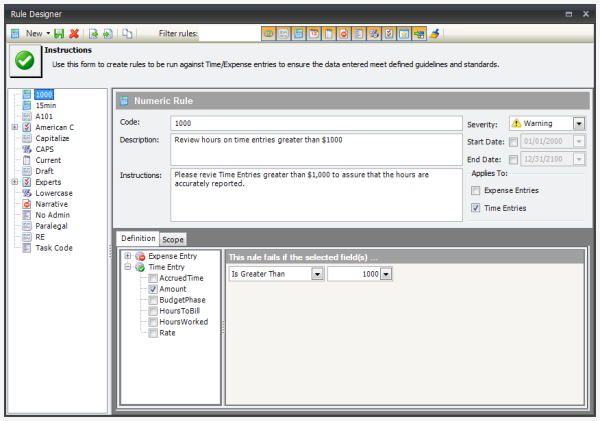
Type a Code for the rule.
-
Type a Description for the rule.
-
Select a Severity: Error, Required, Warning, or Message.
-
(Optional) Type or select a Start Date and End Date for the rule.
A start and end date let you define a time frame for the Rule. For example if you only want the rule to be run in the current year or a specific month.
-
Type Instructions for the rule.
The instructions are shown when an item is rejected based on the rule, and gives the user specific instructions on how to resolve the violation.
For a Text Rule there are also additional options to select: Case-Sensitive, Ignore if Blank, and Match Whole Word.
-
On the Definition tab, select the fields where the rule should be applied. You can expand Time Entry and Expense Entry to see the available fields.
-
Under the text This rule fails if the selected field(s)..., select the rule fail criteria. Selections are DOES, CONTAIN, and ANY.
- In the List RE: text box, type the text to which the rule applies.
-
(Optional) On the Scope tab, assign the scope to a particular group. By default, the scope is applied to all Time Entries and Expense Entries.
To set the rule's scope for a particular group, please refer to the steps found under Define or modify/edit a Scope below.
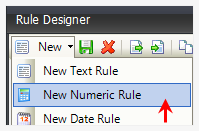
New Numeric Rule - This rule can be used to assure that numeric values in entries meet certain criteria. For example:
- Timekeepers cannot exceed established rates for Client 9512.
- Hours to bill should not exceed 8 hours on one time entry.
- Rates must be at or above minimum levels approved by firm management.
If you firm needs to enforce these types of rules as firm policy or via a client mandate, establishing a Numeric rule can ensure that rules are automatically enforced.
To create a Numeric rule
-
Select New Numeric Rule from the New list.
A new Numeric Rule window opens.
-
Type a Code for the rule.
-
Type a Description for the rule.
-
Select a Severity: Error, Required, Warning, or Message.
-
(Optional) Type or select a Start Date and End Date for the rule.
A start and end date let you define a time frame for the Rule. For example if you only want the rule to be run in the current year or a specific month.
-
Type Instructions for the rule.
The instructions are shown when an item is rejected based on the rule, and gives the user specific instructions on how to resolve the violation.
-
On the Definition tab, select the fields where the rule should be applied. You can expand Time Entry and Expense Entry to see the available fields.
-
Under the text This rule fails if the selected field(s)..., select the rule fail criteria. Selections are EQUAL TO, NOT EQUAL TO, LESS THAN, LESS THAN OR EQUAL, GREATER THAN, GREATER THAN OR EQUAL, BETWEEN, NOT BETWEEN, and NOT A MULTIPLIER OF.
-
(Optional) On the Scope tab, assign the scope to a particular group. By default, the scope is applied to all Time Entries and Expense Entries.
To set the rule for a particular group, please refer to the steps found under Define or modify/edit a Scope below.
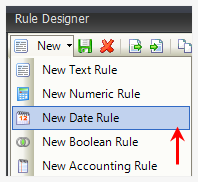
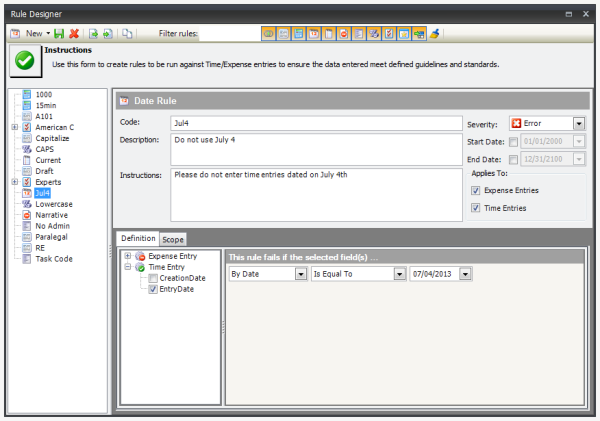
New Date Rule - This rule can be used to black out certain dates or date ranges. For example:
- Do not allow time entries to be dated after March 3, 2007 for timekeeper ABC.
- Do not allow time entries to be dated on Saturday or Sunday.
- Do not allow entries dated prior to January 15, 2007 for a particular Client or Matter.
If your firm needs to enforce these types of rules as firm policy or via a client mandate, establishing a Date Rule can see that the rules are automatically enforced.
To create a Date rule
-
Select New Date Rule from the New list.
A new Date Rule window opens.
-
Type a Code for the rule.
-
Type a Description for the rule.
-
Select a Severity: Error, Required, Warning, or Message.
-
(Optional) Type or select a Start Date and End Date for the rule.
A start and end date let you define a time frame for the Rule. For example if you only want the rule to be run in the current year or a specific month.
-
Type Instructions for the rule.
The instructions are shown when an item is rejected based on the rule, and gives the user specific instructions on how to resolve the violation.
-
On the Definition tab, select the fields where the rule should be applied. You can expand Time Entry and Expense Entry to see the available fields.
-
Under the text This rule fails if the selected field(s)..., select the rule fail criteria. Selections are DATE, DAY OF WEEK, DAY OF MONTH, and MONTH.
-
(Optional) On the Scope tab, assign the scope to a particular group. By default, the scope is applied to all Time Entries and Expense Entries.
To set the rule for a particular group, please refer to the steps found under Define or modify/edit a Scope below.
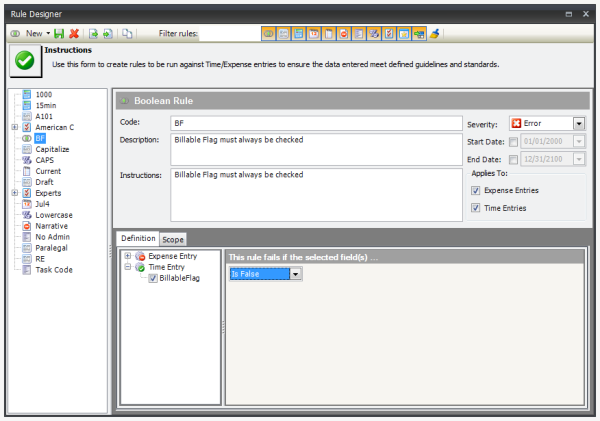
New Boolean Rule - This rule can be used to assure that certain fields are set correctly. For example:
- The Billable Flag on a Time Entry for Client ABC must always be checked.
- Expense Codes must always be flagged to 'Summarize'.
If your firm needs to enforce these types of rules as firm policy or via a client mandate, establishing a Boolean Rule can see that the rules are automatically enforced.
To create a Boolean rule
-
Select New Boolean Rule from the New list.

A new Boolean Rule window opens.
-
Type a Code for the rule.
-
Type a Description for the rule.
-
Select a Severity: Error, Required, Warning, or Message.
-
(Optional) Type or select a Start Date and End Date for the rule.
A start and end date let you define a time frame for the Rule. For example if you only want the rule to be run in the current year or a specific month.
-
Type Instructions for the rule.
The instructions are shown when an item is rejected based on the rule, and gives the user specific instructions on how to resolve the violation.
-
On the Definition tab, select the fields where the rule should be applied. You can expand Time Entry and Expense Entry to see the available fields.
-
Under the text This rule fails if the selected field(s)..., select the rule fail criteria. Selections are IS TRUE and IS FALSE.
-
(Optional) On the Scope tab, assign the scope to a particular group. By default, the scope is applied to all Time Entries and Expense Entries.
To set the rule for a particular group, please refer to the steps found under Define or modify/edit a Scope below.
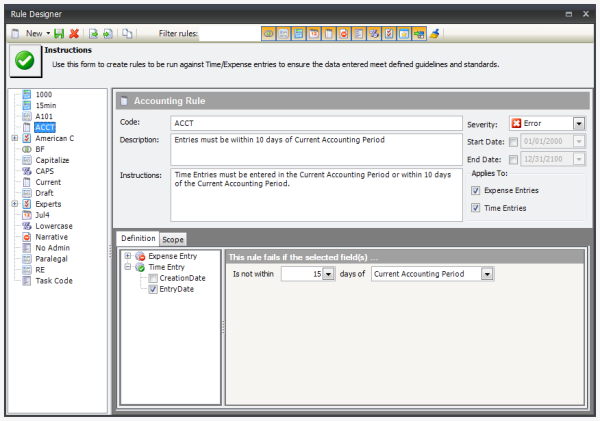
New Accounting Rule - This rule can be used to assure that time or expense entries are not dated within a certain number of days in the current Accounting Period or Accounting Year. For example:
- Time Entry date must be within 10 days of the current Accounting Period.
- Our client will only allow us to bill for current Accounting Year and 5 days from the previous year.
- Expense Entries must be entered within 1 day of the current Accounting Period. If your firm needs to enforce these types of rules as firm policy or via a client mandate, establishing an Accounting Rule can see that the rules are automatically enforced.
To create an Accounting rule
-
Select New Accounting Rule from the New list.
A new Accounting Rule window opens.
-
Type a Code for the rule.
-
Type a Description for the rule.
-
Select a Severity: Error, Required, Warning, or Message.
-
(Optional) Type or select a Start Date and End Date for the rule.
A start and end date let you define a time frame for the Rule. For example if you only want the rule to be run in the current year or a specific month.
-
Type Instructions for the rule.
The instructions are shown when an item is rejected based on the rule, and gives the user specific instructions on how to resolve the violation.
-
On the Definition tab, select the fields where the rule should be applied. You can expand Time Entry and Expense Entry to see the available fields.
-
Under the text This rule fails if the selected field(s)..., select the rule fail criteria.
-
(Optional) On the Scope tab, assign the scope to a particular group. By default, the scope is applied to all Time Entries and Expense Entries.
To set the rule for a particular group, please refer to the steps found under Define or modify/edit a Scope below.
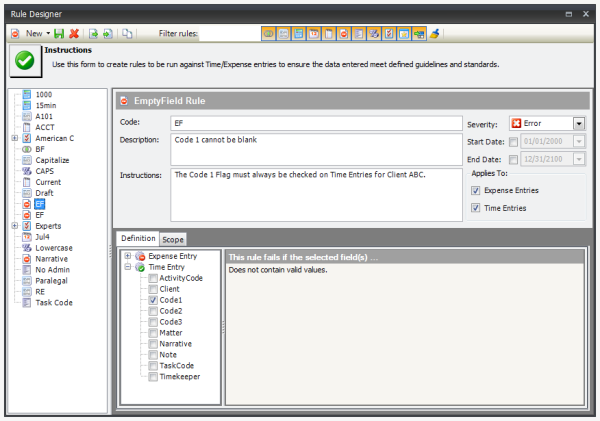
New Empty Field Rule - This rule can be used to assure that fields are not left blank on the Time or Expense Entry form. For example:
- The Time Entry Note field must always have the day of the week the work was done.
- The Narrative of an Expense Entry must always have text.
- Task Codes are required on all Expense Entries.
If your firm needs to enforce these types of rules as firm policy or via a client mandate, establishing an Empty Field Rule can see that the rules are automatically enforced.
To create an Empty Field rule
-
Select New Empty Field Rule from the New list.
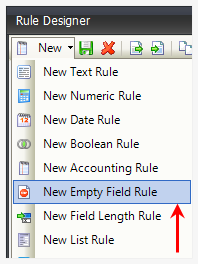
A new Empty Field Rule window opens.
-
Type a Code for the rule.
-
Type a Description for the rule.
-
Select a Severity: Error, Required, Warning, or Message.
-
(Optional) Type or select a Start Date and End Date for the rule.
A start and end date let you define a time frame for the Rule. For example if you only want the rule to be run in the current year or a specific month.
-
Type Instructions for the rule.
The instructions are shown when an item is rejected based on the rule, and gives the user specific instructions on how to resolve the violation.
-
On the Definition tab, select the fields where the rule should be applied. You can expand Time Entry and Expense Entry to see the available fields.
-
(Optional) On the Scope tab, assign the scope to a particular group. By default, the scope is applied to all Time Entries and Expense Entries.
To set the rule for a particular group, please refer to the steps found under Define or modify/edit a Scope below.
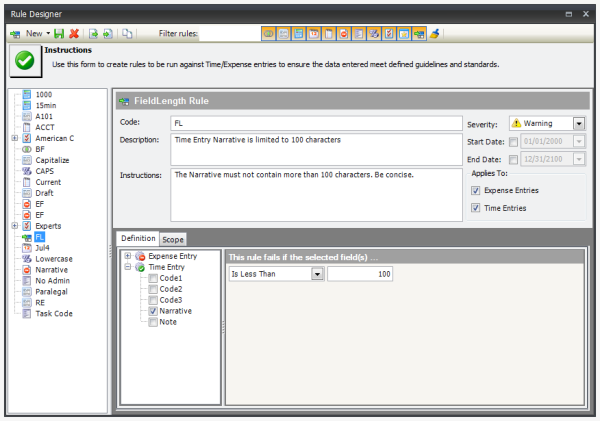
New Field Length Rule - This rule can be used to ensure compliance for standards on data entry. For example:
- To place limitations on description fields.
If your firm needs to enforce these types of rules as firm policy or via a client mandate, establishing a Field Length Rule can ensure that compliance is automatically enforced.
To create a Field Length rule
-
Select New Field Length Rule from the New list.
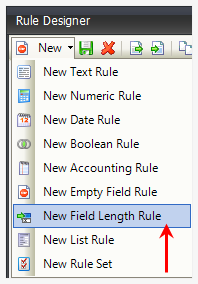
A new Field Length Rule window opens.
-
Type a Code for the rule.
-
Type a Description for the rule.
-
Select a Severity: Error, Required, Warning, or Message.
-
(Optional) Type or select a Start Date and End Date for the rule.
A start and end date let you define a time frame for the Rule. For example if you only want the rule to be run in the current year or a specific month.
-
Type Instructions for the rule.
The instructions are shown when an item is rejected based on the rule, and gives the user specific instructions on how to resolve the violation.
-
On the Definition tab, select the fields where the rule should be applied. You can expand Time Entry and Expense Entry to see the available fields.
-
Under the text This rule fails if the selected field(s)..., select the rule fail criteria. Selections are EQUAL TO, NOT EQUAL TO, LESS THAN, LESS THAN OR EQUAL, GREATER THAN, and GREATER THAN OR EQUAL TO.
-
(Optional) On the Scope tab, assign the scope to a particular group. By default, the scope is applied to all Time Entries and Expense Entries.
To set the rule for a particular group, please refer to the steps found under Define or modify/edit a Scope below.
New List Rule - This rule can be used assure that certain information is included or excluded from entries. For example:
- Never allow time entries with Timekeeper AAA on Client 8574.
- Timekeeper ABC does not want the Task Codes B100 or B110 used on his entries.
- Do not use the Activity Code A102 on an entry with Task Code B110.
If your firm needs to enforce these types of rules as firm policy or via a client mandate, establishing a List Rule can see that the rules are automatically enforced.
To create a List rule
-
Select New List Rule from the New list.
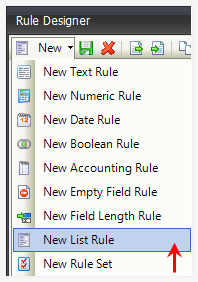
A new List Rule window opens.
-
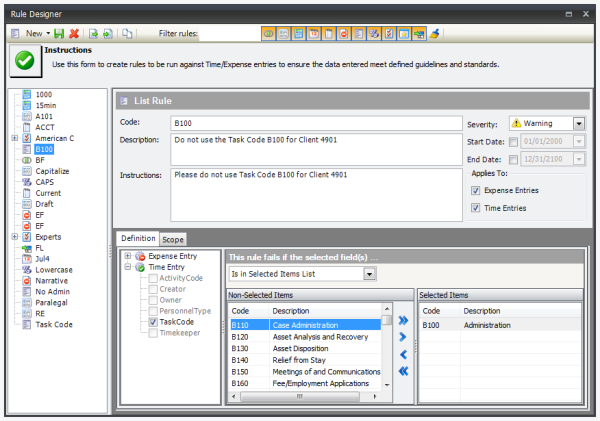
Type a Code for the rule.
-
Type a Description for the rule.
-
Select a Severity: Error, Required, Warning, or Message.
-
(Optional) Type or select a Start Date and End Date for the rule.
A start and end date let you define a time frame for the Rule. For example if you only want the rule to be run in the current year or a specific month.
-
Type Instructions for the rule.
The instructions are shown when an item is rejected based on the rule, and gives the user specific instructions on how to resolve the violation.
-
On the Definition tab, select the fields where the rule should be applied. You can expand Time Entry and Expense Entry to see the available fields.
-
Under the text This rule fails if the selected field(s)..., select the rule fail criteria. Selections are IS IN SELECTED ITEMS LIST and IS NOT IN SELECTED ITEMS LIST.
-
(Optional) On the Scope tab, assign the scope to a particular group. By default, the scope is applied to all Time Entries and Expense Entries.
To set the rule for a particular group, please refer to the steps found under Define or modify/edit a Scope below.
New Rule Set - A Rule Set is when a combination of 2 or more of the aforementioned rule types are used together to create one rule containing multiple rule type criteria. Creating a Rule Set when you have multiple types of rules for one Client/Matter saves time, especially since you can assign the scope at the top level and not have to do it for each individual rule.
To create a Rule Set
-
Select New Rule Set from the New list.
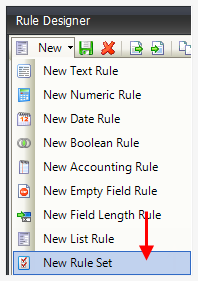
A new Rule Set window opens.
-
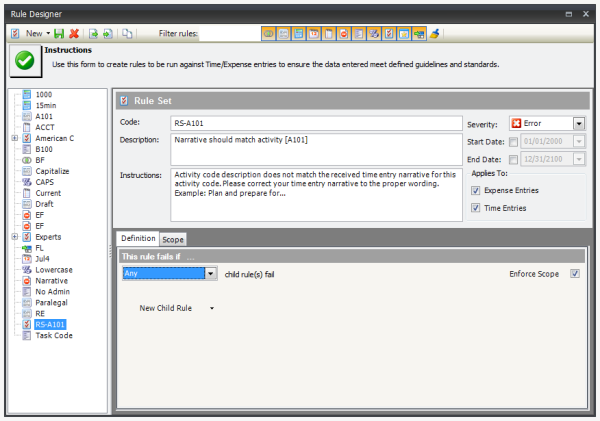
Type a Code for the rule.
-
Type a Description for the rule.
-
Select a Severity: Error, Required, Warning, or Message.
-
(Optional) Type or select a Start Date and End Date for the rule.
A start and end date let you define a time frame for the Rule. For example if you only want the rule to be run in the current year or a specific month.
-
Type Instructions for the rule.
The instructions are shown when an item is rejected based on the rule, and gives the user specific instructions on how to resolve the violation.
-
Under the text This rule fails if ..., select the rule fail criteria. Selections are ANY and ALL.
Any - Select this option if you want this rule to produce a failure if ANY child rule fails.
All - Select this option if you want this rule to produce a failure only if ALL child rules fails.
If you selected 'Any,' you must also select whether or not to enforce scope.
If you selected 'All,' you must enter a issue text in the text box that appears.
-
(ANY only) Check the Enforce Scope check box to ensure that the scope is enforced on all tasks. Note that this option is not available if you have selected 'All.'
-
(ALL only) Type your issue text in the provided text box.
-
Click the New Child Rule arrow and select the rule type you want to include in the rule set.
-
Refer to the appropriate section above that pertains to the rule type you have selected.
-
Repeat steps j and k for each child rule you want to create.
-
(Optional) On the Scope tab, assign the scope to a particular group. By default, the scope is applied to all Time Entries and Expense Entries.
To set the rule for a particular group, please refer to the steps found under Define or modify/edit a Scope below.
- Click the Save button on the toolbar to save the rule.
The steps for defining a scope are the same for an individual rule or a Rule Set containing many rules.
To define a scope:
- Click on the Scope tab to open it.
-
Select whether the scope is Global or not. If not, uncheck the check box.
Once unchecked, other options appear below the + and X signs. These options let you set the scope for a particular group.
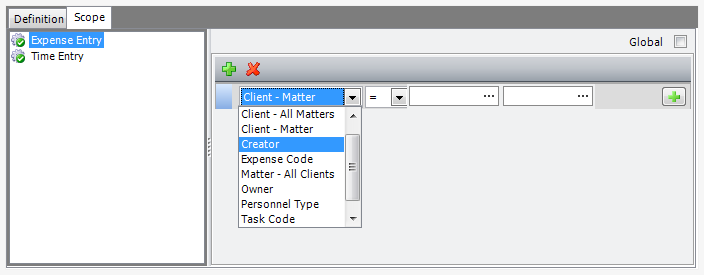
To set the scope to a particular group:
- Click on the first arrow and select the group.
-
Click on the second arrow and select the operand.
Based on what you selected under the first arrow, a specific set of criteria text boxes appear on the right.
-
Click on the ellipses to open a lookup window to select the criteria, and then click OK.
If there are multiple text boxes, repeat step c for each one.
Note
Multiple Scope types may be established for the same rule. For example, if a rule is to be applied when either a certain Task Code or a certain Client Code are used, then you may select a scope type for both Task Code and Client Code. However, if your rule requires that a certain Task Code AND a certain Client Code be used before the rule is applied, then a Rule Set must be created.
If a Rule Set is used, you can check the Enforce Scope option to apply to all the rules within that set, EVEN if there is a scope defined on those rules.
- Repeat steps a through c for each scope type you want to use.
- Click the Save button on the toolbar to save the rule.