Getting the most out of Converted Bill Formats
|
The following information only applies to upgrades from version 2.0x and earlier. |
The Bill Designer has changed dramatically in Juris version 2.1 in order to offer new features that Juris users have requested; and those features have been packaged in an easy-to-use new interface.
Juris will convert existing bill formats from
previous versions of Juris, but those converted formats might not take
advantage of the full functionality available in Juris 2.1. After
conversion, follow the checklist below to make sure that your formats
are ready-to-go for your next billing cycle. Alternatively, consider
trying one of the pre-written 2.1 formats included on the CD or the other
bill format design services offered by Juris.
It is highly recommended to PRINT A PREBILL
AND FINAL BILL FROM EACH OF YOUR CONVERTED FORMATS after upgrading to
Juris 2.1. This is an essential part of the conversion process.
If any issues are found with the printed formats, review the tips below
or contact your Juris Support provider for additional assistance.
SUGGESTED
POST CONVERSION STEPS:
- Review
all Formats. Open each format and review it quickly to familiarize
yourself with the new interface and to verify that the format converted.
- Consider
Editing Overlapping Fields: Standard row height has been removed
in 2.1, allowing the user to determine the height of a row by the height
and placement of the fields. The example below shows how, after
conversion, some fields may become slightly overlapped.
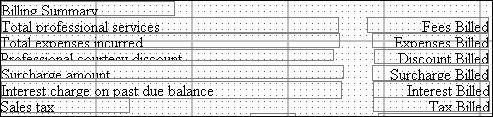
When you see fields that are touching or overlapping like those shown above, take a few minutes to separate those fields to remove the overlap. Pay special attention to fields that are set to suppress the row when zero. For more information on the suppression fields, see the topic “Suppress Line If Zero” in the Field Properties section of the Bill Designer chapter of the 2.1 documentation for details.
- Consider Removing Date Group in Fee Detail: In version 2.05 and earlier, the fee detail of all bill formats were grouped by date by default. In 2.1, grouping of fee detail is optional, and is only needed when subtotals are required for each group. If you did not actually use the Date grouping in 2.05, you may consider removing this grouping entirely to avoid issues when selecting multiple items while in edit prebills (multiple items may only be selected for edit within the same group.)
- Expense Summary Detail: This is a new section that will display the detail of a summarized expense on the prebill. This section is designed to allow the detail of summarized expenses to be edited in Edit Prebill. This section can be printed on prebills and final bills as well, but by default it will print only on prebills. If you do not want this section to print at all, right click on the Expense Summary Detail bar in the designer and Select Properties. Change the ‘Visible’ property to ‘False’, and Save. This will prevent the section from printing - but it will still be available in Edit Prebills.
- Prebill Banner Page: The prebill banner page is now optional. In the Bill Designer Properties - File; Properties; Design Options; Change the Banner Page to be ‘Prebill Only’. You can also delete it all together. View the 2.1documentation for more information on how to delete the banner page.
- Edit
Box: The grey bars that used to print on prebills in previous versions
are included in the conversion of bill formats for both fees and expenses.
These sections can be deleted if you do not wish to see them. Open the
bill format and use the ‘Collapse Subsections’ icon on the toolbar. You’ll
see a grey bar that says ‘Edit Box’, simply select the sections by clicking
with the mouse and press the delete key.
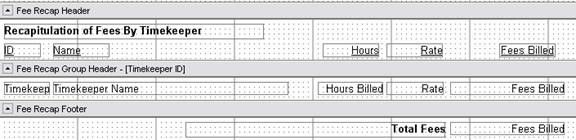
- New
Recaps: Recaps have been made more powerful and are more customizable
that ever before. Detailed examples of the recap sections
are available in the Juris 2.1 documentation. Look for the Subsections
topic in the Bill Designer chapter for details. However, to easily
set up a 2.0-style fee recap, use the following examples for Billed, Average
and Worked fee recap designs in 2.1.
Average:
To get a fee recap section showing one line
per timekeeper and using the average rate (average worked rate or average
billed rate) design as shown in the following example.
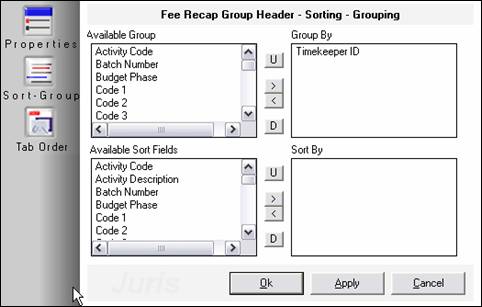
Group By Timekeeper and place line items in the TIMEKEEPER ID Fee Group Header
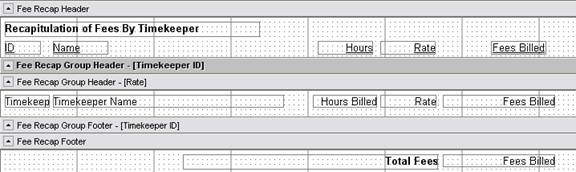
Billed
To get a fee recap section showing one line
for each timekeeper’s billed rate (when the same timekeeper bills at different
rates) design as shown in the following example.
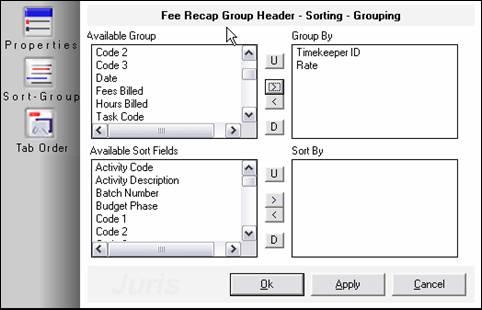
Group By Timekeeper first; then Group By Rate and place line items in the RATE Fee Group Header:
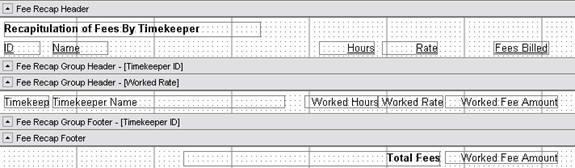
Worked:
To get a fee recap section showing one line
for each timekeeper’s worked rate (when the same timekeeper bills at different
worked rates) design as shown in the following example.
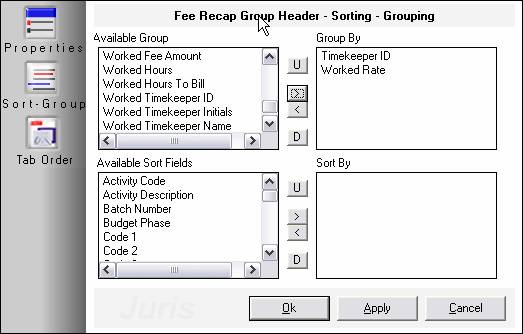
Group By Timekeeper first; then Group By Worked Rate and place line items in the WORKED RATE Fee Group Header:
NEW TO 2.1
Adding these new features will make your converted
formats even better:
- Add
More Graphics: In 2.1, Juris will allow multiple graphics to
be added to the format, so go ahead and include your letterhead graphic
on the Cover Page as well as the Expense Attachment and Bill Format.
- Add
Keep Together and Page Break Settings. Juris 2.1 offers a Page
Break feature as well as a Keep Together and Group Keep together feature.
You may decide to add a page break or keep together feature to your existing
formats. Refer to the 2.1 Supplemental Documentation to find out
more about these features and how they are used.
- Customize
the Banner Page: Juris will convert the Banner Page exactly
as it was designed in 2.05 and earlier, but now you have the choice to
edit the Banner Page to show much of the same information that is available
on the bill format. You also have the choice to remove the Banner
Page altogether.
- New
Behavior of White Space and Control Fields: Juris 2.1 will observe
the white space as drawn in the bill designer, so there is no need for
spacer fields or blank lines to be forced in the bill format. The
example below shows a converted format that uses hidden text fields (labled
as ‘blank‘) for spacers to assure that the white space prints in the correct
location.
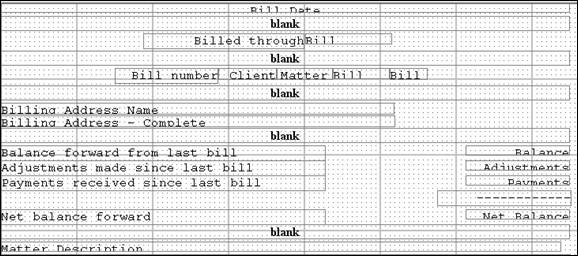
Juris will convert these fields as-is, but you may want to remove all of these unnecessary fields from your bill’s design as they will be visible in Edit Prebills.