Create, edit or delete Bank Accounts
Create a Bank Account
-
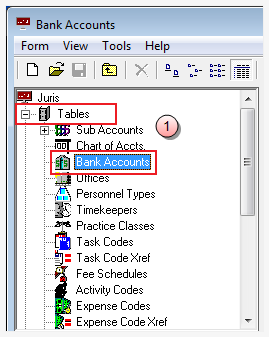
Select Tables > Bank Accounts.

-
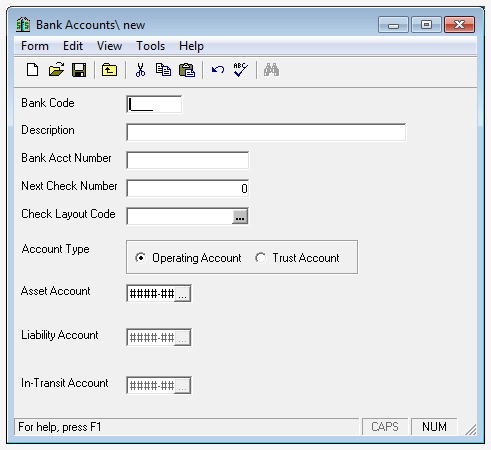
Click the New icon on the toolbar to open the Bank Account window.
Alternatively, you can select Form > New from the menu, or press Ctrl + N on your keyboard.

- Enter a 1-4 character, Bank Code.
- Enter a 1-99 character, alphanumeric Description.
- Enter a 1-15 character, alphanumeric Bank Acct Number.
- Enter a 1-10 character, numeric Next Check Number.
- Select a Check Layout Code from the available layouts drop-down list (See Check Design for more details on creating Check Layouts.)
-
The account must be defined as either an Operating Account or a TrustAccount.
Note
The Trust Account option remains disabled unless your firm has purchased and installed a license for the optional Disbursements Module.
-
Select the appropriate account numbers. The Asset Account is required for both Operating Accounts and Trust Accounts. Additionally, the Liability and In-transit account numbers must be supplied for Trust Accounts. Each bank MUST have separate Asset, Liability and In-Transit accounts.
Note
Purpose of the Trust In-Transit Account: Trust applied in Edit Prebills is recorded by debiting the Trust In-Transit account when the bill is Posted. Once the Trust check has been printed and deposited in Cash Receipts, the Trust In-Transit Account is credited and the Asset Account for the appropriate Bank Account is then debited.
-
Click the Spell Check icon in the toolbar to open the Spell check window.
Alternatively, you can select Form > Spelling from the menu, or press F7 on your keyboard.
-
Click the Save icon to save the new bank account.
Alternatively, you can select Form > Save from the menu, or press Ctrl + S on your keyboard.
Edit an existing Bank Account
- Select Tables > Bank Accounts.
- Open the existing Bank Account using any of the following methods:
- Double-click the icon or description for the account that must be edited.
- Use the arrow keys on the keyboard to move through the list and select the account that must be edited, then hit the Enter key.
-
Make any necessary modifications desired.
Note
The Code and Account Type cannot be changed.
-
Click the Spell Checkicon on the toolbar to open the Spell check window.
Alternatively, you can select Form > Spelling from the menu, or press F7 on your keyboard.
-
Click the Spell Check icon in the toolbar to open the Spell check window.
Alternatively, you can select Form > Spelling from the menu, or press F7 on your keyboard.
Delete Bank Account
- Open Tables > Bank Accounts.
-
Double-click the icon or description of the bank account to be deleted.
Alternatively, you can use the arrow keys on the keyboard to move through the list and highlight the account that must be deleted.
-
Click the Delete icon on the toolbar to delete the selected account.
Alternatively, you can select Form > Delete from the menu, or press Alt + F, D on your keyboard.
If the Bank Account is referenced elsewhere in Juris, the software will not allow the account to be deleted, and instead will show a message stating that the account may not be deleted. Otherwise, the system will prompt "Are you sure you want to delete this account?"
-
Click Yes or press the enter key to proceed with the deletion.
Click No, or tab to the No button and press enter to cancel the deletion.