Select prebills
To make the appropriate selection for Prebills, perform the following: See Figure 1.0
- Select Billing.
-
Click on the Select Prebills icon in the right panel.
The Billing\Select Prebills window opens.
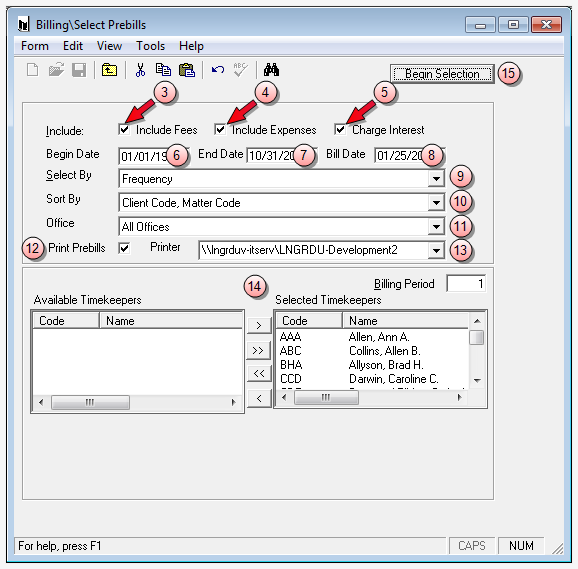
- Click on the Include Fees check box to select it, if you want to include all bills on which there are fee charges.
- Click on the Include Expenses check box to select it, if you want include all bills on which there are expense charges.
- Click on the Charge Interest check box to select it, if you want to include all bills on which there are interest charges.
- In the Begin Date box, accept the default or type in the date you want to start with.
- In the End Datebox, accept the default or type in the date with which you want to end.
- In the Bill Date box, accept the default (today's date) or type in the date that you want displayed on the prebills.
-
Click the Select by arrow and select the option you want.
- Frequency - This option allows you to select bills based on their Billing Frequency.
-
Cycle - This option allows you to select bills based on the Cycle set at the Matter Level.
- Billing Timekeeper - This option allows you to select prebills for matters with a particular Billing Timekeeper.
- Client/All Matters - This option allows you to select prebills for all matters and consolidations for a particular client.
- Consolidation Name OR Matter - This option allows you to specifically list each Consolidation or each Matter that you would like to select.
- Client Range - This option allows you to select prebills for a range of clients.
- Click on the Sort By arrow, and select the option you want to use.
- Click on the Office if there is more than one office available, and select an office.
-
(Optional) Click the Print Prebills check box to select it, if you .
If checked, the 'Printer' combo box is enabled and displays the default printer on your PC, but also allows you to select another printer.
- (Optional) Click on the Printer arrow if you want to select a different printer.
-
Type or select the appropriate options, based on the 'Select by' option you chose in step 9.
 Frequency
The Billing Frequency is determined at the Matter Level for fees and expenses and may be set to Monthly, Quarterly, Semiannually, Annually or On Cycle. Matters set to Quarterly, Semiannual, or Annual frequency also require that a billing period (Billing Month) be set.
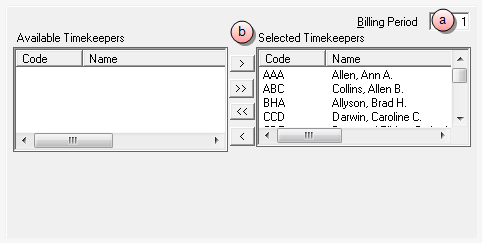
When Select By Frequency is used, all matters set to Monthly are selected as well as any Quarterly, Semiannual, or Annual matters whose Billing Month on the matter level matches the Billing Period chosen in Select Prebills. By default, all Timekeepers are included in the selection; however, you may choose to further restrict the selection criteria by choosing to include/exclude particular .
-
In the Billing Period box, accept the default of 1, or type the number of billing periods you want to include.
-
(Optional) Do any of the following, depending on the timekeepers you want to select.
- Too add a timekeeper, click on the name in the Available Timekeepers list and click the right arrow button to add them to the Selected Timekeepers list.
- To remove a timekeeper, click on the name in the Selected Timekeepers list and click the left arrow button to move them to the Available Timekeepers list.
- To add all timekeepers in the Available Timekeepers list to the Selected Timekeepers list, click the double right arrow button.
- To remove all timekeepers in the Selected Timekeepers list, click double left arrow button. All timekeepers are moved to the Available Timekeepers list.
-
When finished, go to step 15.
 Cycle
Cycle
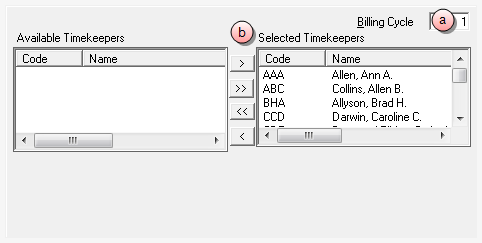
When Cycle is set at the matter level, a cycle number must also be entered for that matter. The cycle may be any number between 1 and 999. The Cycle feature allows a firm to establish their own, custom billing cycle based on their unique needs.
Example: A firm may chose to establish a weekly cycle, where bills are selected every week and each matter is set to cycle 1, 2, 3 or 4. The first week of the month, cycle 1 matters would be selected, cycle 2 matters would be selected the second week of the month and so on. This weekly system would divide the large, monthly billing run into 4 smaller, more manageable billing runs. Sending out bills in cycles also encourages A/R to enter the firm throughout the month.
Note
The On Cycle option can be used to establish virtually any type of custom selection cycle that a firm might require.
 .
.-
In the Billing Cycle box, accept the default of 1, or type the number of billing cycles you want to include.
-
(Optional) Do any of the following, depending on the timekeepers you want to select.
Note
A timekeeper is the person who is in day-to-day charge of a client or matter. Typically the billing Timekeeper would be responsible for all transactions for that client or matter, including Trust Account responsibility.
- Too add a timekeeper, click on the name in the Available Timekeepers list and click the right arrow button to add them to the Selected Timekeepers list.
- To remove a timekeeper, click on the name in the Selected Timekeepers list and click the left arrow button to move them to the Available Timekeepers list.
- To add all timekeepers in the Available Timekeepers list to the Selected Timekeepers list, click the double right arrow button.
- To remove all timekeepers in the Selected Timekeepers list, click double left arrow button. All timekeepers are moved to the Available Timekeepers list.
- When finished, go to step 15.
 Billing Timekeeper
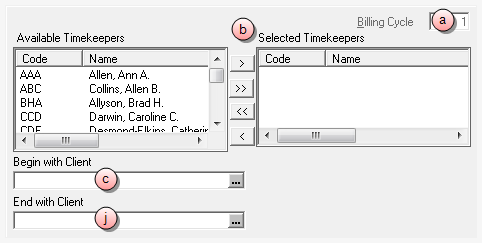
Available Timekeepers are listed on the right side of the form. When moved to the Selected timekeepers list on the left side of the form, then matters for that Billing Timekeeper may be selected. A client range may also be specified by entering a beginning and ending client in the client range boxes, shown highlighted above, but these will default to First and Last to include all clients unless otherwise defined by the user.
-
In the Billing Cycle box, accept the default of 1, or type the number of billing cycles you want to include.
-
(Optional) Do any of the following, depending on the timekeepers you want to select.
- Too add a timekeeper, click on the name in the Available Timekeepers list and click the right arrow button to add them to the Selected Timekeepers list.
- To remove a timekeeper, click on the name in the Selected Timekeepers list and click the left arrow button to move them to the Available Timekeepers list.
- To add all timekeepers in the Available Timekeepers list to the Selected Timekeepers list, click the double right arrow button.
- To remove all timekeepers in the Selected Timekeepers list, click double left arrow button. All timekeepers are moved to the Available Timekeepers list.
-
Click on the Begin with Client ellipses button, to select a specific client you want to start with.
The Billing\Select Prebills : Client / Matter Finder window opens.
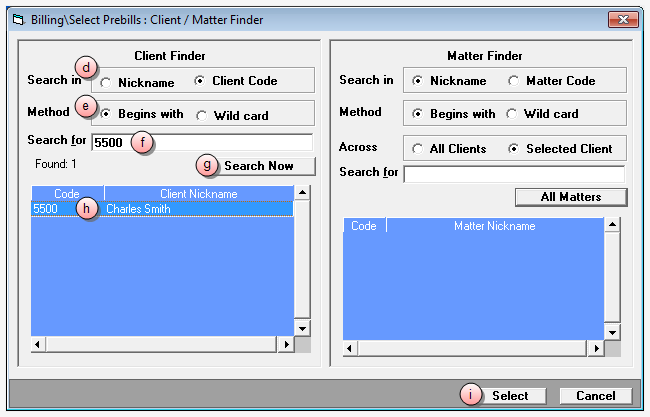
- Click on the Search in option you want to use to find the client.
- Click on the Method option you want to use to find the client.
-
In the Search for box, type the text for which you want to search.
-
Click the Search Now button.
A list of clients matching your search criteria displays in the list.
- Click on the client row you want, to select it.
- Click the Select button.
- Click on the End with Client ellipses button and follow the same steps above (steps d through i) to find the client with which you want to end.
- When finished, go to step 15.
 Client/Matters
To select prebills for all matters and consolidations for a particular client:
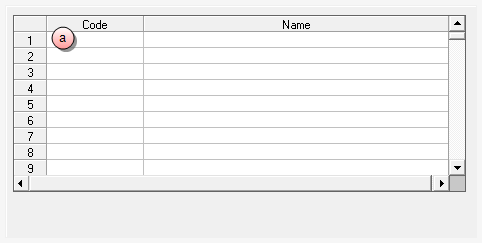
If you know the client code:
- In the first row Code cell, type the client code for the client you want to use.
- Repeat for each client code you want to add.
- When finished, go to step 15.
If you do not know the client code:
-
Select Edit > Find from the menu to open the Billing\Select Prebills : Client / Matter Finder window.
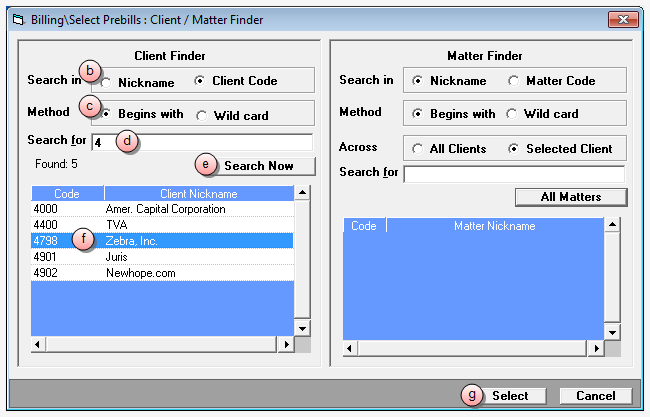
- Click. on the Search in option you want to use to find the client.
- Click on the Method option you want to use to find the client.
- In the Search for box, type the text for which you want to search.
-
Click the Search Now button.
A list of clients matching your search criteria displays in the list.
- Click on the client row you want, to select it.
-
Click the Select button.
The client you selected is added to the row.
- Repeat these steps for each client you want to add.
- When finished, go to step 15.
 Consolidation Name OR Matter
This feature is most often used for on-the-fly selections of particular, individual bills, when using a selection range is unnecessary.
To select by Consolidation Name:
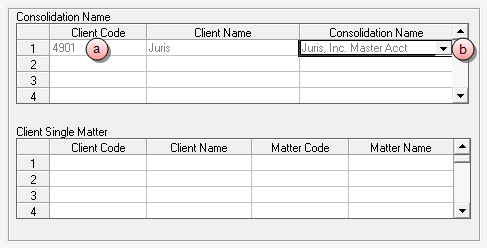
-
In the Client Code cell, type the client code, or use the Billing\Select Prebills : Client / Matter Finder window (Edit > Find) to select a client.
If the client has only one consolidation, The 'Consolidation Name' cell is automatically filled in when you enter the Client Code. Skip step b.
If multiple consolidations are available, the 'Consolidation Name' cell becomes a drop-down list of all available consolidations.
- If multiple consolidations exist, click on the arrow and select the Consolidation Name you want to use.
To select by Client Single Matter:
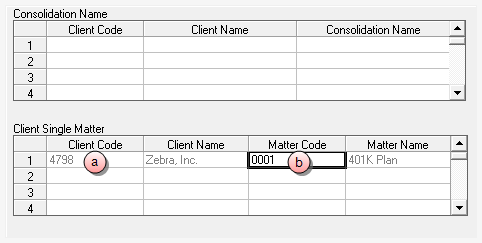
- In the Client Code cell, type the client code.
-
In the Matter Code cell, type the matter code.
Alternatively, you can use the Billing\Select Prebills : Client / Matter Finder window as described below, to select both the client and matter.
Skip to step n if you have already entered a client code and matter code. Steps 'c through n' are specific to the finder window.
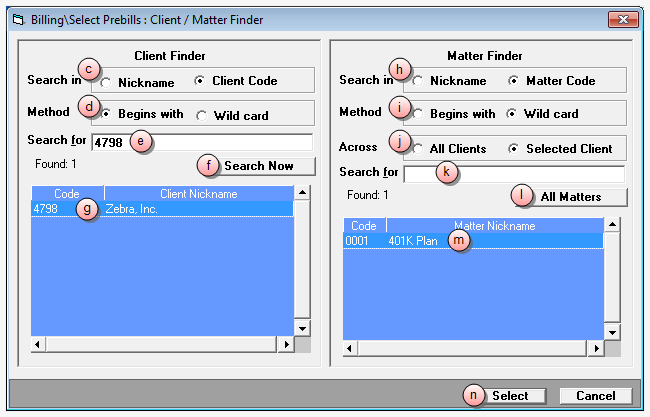
- Click on the Search in option you want to use from the Client Finder pane.
- Click on the Method option you want to use from the Client Finder pane.
-
In the Search for box of the Client Finder pane, type the text for which you want to search.
-
Click the Search Now button in the Client Finder pane.
A list of clients matching your search criteria displays in the list.
- Click on the client row you want, to select it.
- Click on the Search in option you want to use from the Matter Finder pane.
- Click on the Method option you want to use from the Matter Finder pane.
- Click on the Across option you want to use from the Matter Finder pane.
-
In the Search for box of the Matter Finder pane, type the text for which you want to search.
-
Click the All Matters button in the Matter Finder pane.
A list of matters matching your search criteria displays in the list.
- Click on the matter row you want, to select it.
-
Click the Select button.
The client/matter you have entered or selected is added to the row.
- Repeat the steps above to add more clients and matters.
- When finished, go to step 15.
 Client Range
To select prebills for a range of clients:
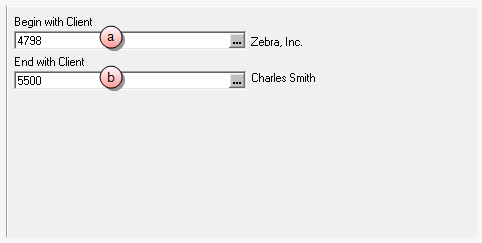
- In the Begin with Client box, type the client you want to start with.
-
In the End with Client box, type the client you want to stop with.
Skip to step l if you have already entered a beginning and ending client code. Steps 'c through k' are specific to the finder window.
-
Click on the Begin with Client ellipses button.

The Billing\Select Prebills : Client / Matter Finder window opens.
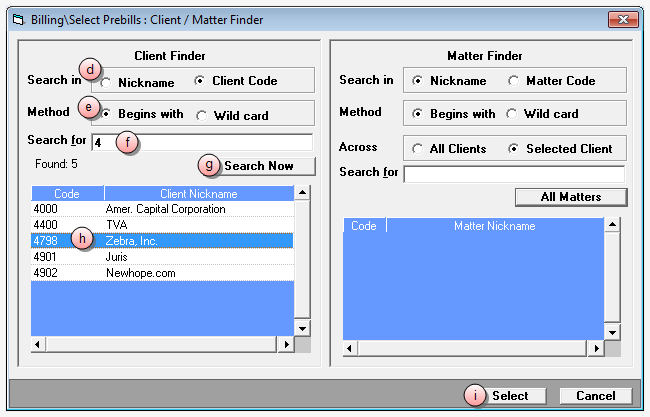
- Click on the Search in option you want to use to find the client.
- Click on the Method option you want to use to find the client.
-
In the Search for box, type the text for which you want to search.
-
Click the Search Now button.
A list of clients matching your search criteria displays in the list.
- Click on the client row you want, to select it.
-
Click the Select button.
The client you selected is added in the Begin with Client box.
-
Click on the End with Client ellipses button.

The Billing\Select Prebills : Client / Matter Finder window opens again.
-
Repeat steps d through i above, to select the ending client code.
The client you selected is added in the End with Client box.
- Go to step 15.
Alternatively, you can use the Billing\Select Prebills : Client / Matter Finder window as described below, to select the client.
-
-
Click the Begin Selection button to start the process.
During the process, you are prompted to decide whether or not to continue without deleting open prebills.
-
When prompted, select the option that matches the action you want to take.
After the process has finished, you are prompted to decide whether or not to view a report of skipped prebills.
-
Click Yes to view the Skipped Prebills Report.
If you clicked Yes, the report is displayed and ready to be printed.