Print a Bill
To print your bill after all edits/changes have been done:
-
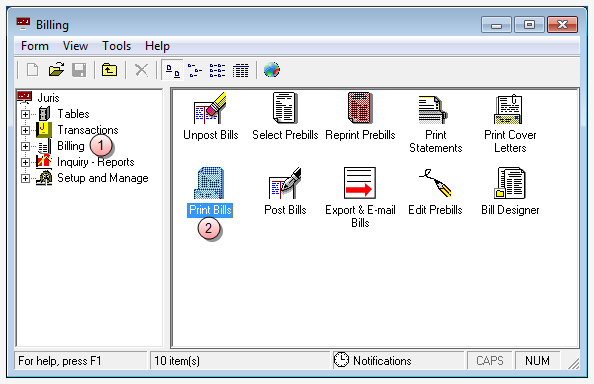
Double-click Billing to open the billing options in the right-side pane.
-
Double-click the Print Bills icon.
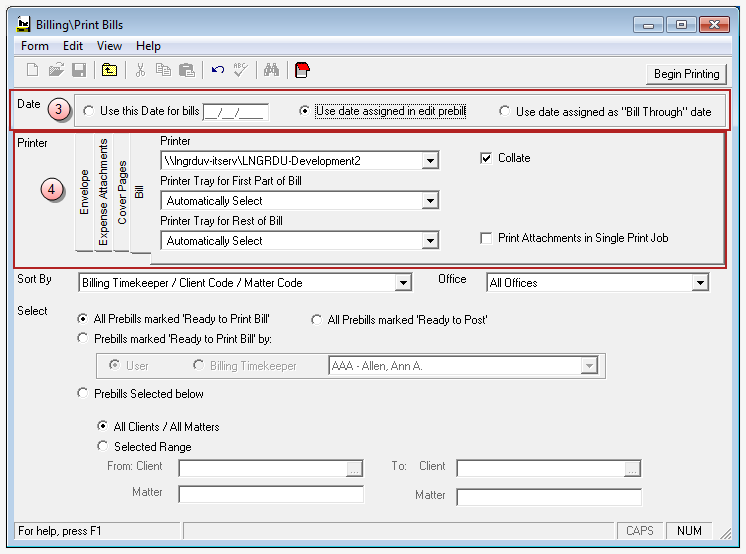
The Billing\Print Bills window opens.
-
Select the Date option you want to use for the billing date.
Use this Date for bills - select this option to define a specific date to use.
Use date assigned in edit prebill - select this option to use the date that was assigned in the prebill.
Use date assigned as "Bill Through" date - select this option to use the date that was setup as the Bill Through date.
-
Select the appropriate printer options for each component of your bills.
 Bill
Bill

- Click the Printer arrow and select the printer to print bills to.
- Click the Printer Tray for First Part of Bill arrow and select the printer tray you want to use for the first page of the bill.
- Click the Printer Tray for Rest of Bill arrow and select the printer tray to use for the remaining bill pages.
-
Click the Collate check box to have the pages automatically collated.
A check mark indicates that collation is selected.
-
Click the Print Attachments in Single Print Job if you want to include all attachments in this one print job.
A check mark indicates that you want to use this option.
 Expense Attachments

- Click the Printer arrow and select the printer to print expense attachments to.
- Click the Printer Tray for First Part of Expense Attachment arrow and select the printer tray you want to use for the first page.
- Click the Printer Tray for Rest of Expense Attachment arrow and select the printer tray to use for the remaining pages.
-
Click the Collate check box to have the pages automatically collated.
A check mark indicates that collation is selected.
 Cover Pages

- Click the Printer arrow and select the printer to print the cover pages to.
- Click the Printer Tray for First Part of Cover Page arrow and select the printer tray you want to use for the first part.
- Click the Printer Tray for Rest of Cover Page arrow and select the printer tray to use for the remaining parts.
-
Click the Collate check box to have the pages automatically collated.
A check mark indicates that collation is selected.
 Envelope

- Click the Printer arrow and select the printer to print envelopes to.
-
Click the Printer Tray arrow and select the tray to use for the envelopes.
-
Click on the Sort by arrow and select the order in which you want the bills sorted.

- Click the Office arrow to select the office for which you want to print bills. This option is only available if you have multiple offices setup.
-
Click on the Select option that corresponds to the bills you want to print:
All Prebills marked 'Ready to Print Bill'
This option prints all bills that have a status of 'Ready to Reprint' in Edit Prebills, or all prebills with a status of 'Ready to Reprint' within a selected client/matter range.
 To print all 'Ready to Print Bill' prebills, for all clients and matters:

- Click on All Prebills marked 'Ready to Print Bill' option.
- Click on the All Clients / All Matters option.
 To print all 'Ready to Print Bill' prebills, for a range of clients/matters:
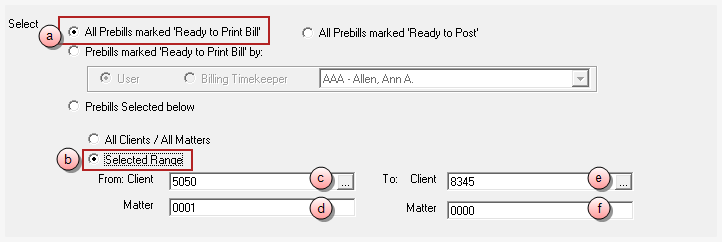
- Click on All Prebills marked 'Ready to Print Bills' option.
- Click on the Selected Range option.
- Click on the From: Client box and type the client number to start with, or click the ellipses button to search for the client/matter in the Finder window.
- Click on the (From) Matter box and type the matter number to start with, or click the ellipses button to search for the client/matter in the Finder window.
- Click on the To: Client box and type the client number to end with, or click the ellipses button to search for the client/matter in the Finder window.
- Click on the (To) Matter box and type the matter number to end with, or click the ellipses button to search for the client/matter in the Finder window.
All Prebills marked 'Ready to Post'
This option prints all bills that have a status of 'Ready to Post' in Edit Prebills, or all prebills with a status of 'Ready to Post' within a selected client/matter range.
 To print all 'Ready to Post' prebills, for all clients and matters:
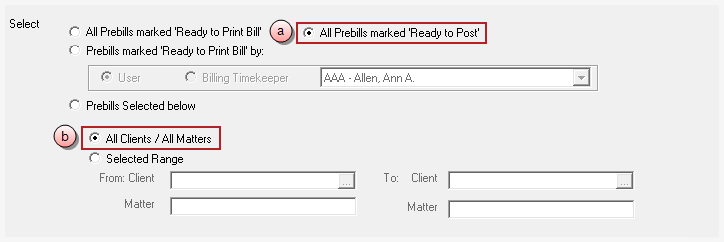
- Click on All Prebills marked 'Ready to Post' option.
- Click on the All Clients / All Matters option.
 To print all 'Ready to Post' prebills, for a range of clients/matters:
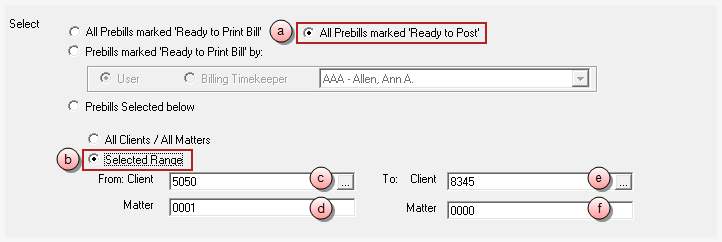
- Click on All Prebills marked 'Ready to Post' option.
- Click on the Selected Range option.
- Click on the From: Client box and type the client number to start with, or click the ellipses button to search for the client/matter in the Finder window.
- Click on the (From) Matter box and type the matter number to start with, or click the ellipses button to search for the client/matter in the Finder window.
- Click on the To: Client box and type the client number to end with, or click the ellipses button to search for the client/matter in the Finder window.
- Click on the (To) Matter box and type the matter number to end with, or click the ellipses button to search for the client/matter in the Finder window.
Prebills marked 'Ready to Print Bill' by:
This option lets you select whether to reprint prebills that were marked ‘Ready to Reprint’ by a particular user or to print prebills of a particular Billing Timekeeper that are marked ‘Ready to Reprint.’
 To print 'Ready to Print Bill" prebills associated with a particular user:
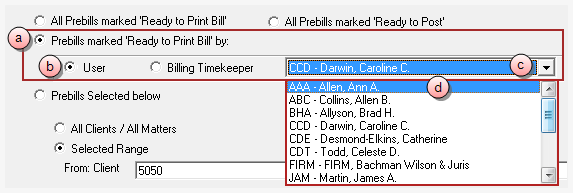
- Click on Prebills marked 'Ready to Print Bill' by: option.
- Click on the User option.
- Click on the arrow to open a list of users.
- Scroll through the list and click on the user you want, to select them.
-
Do one of the following:
-
Click on the All Clients / All Matters option to include all clients/matters associated with this user.

- Click on the Selected Range option to select a range of clients/matters associated with this user.
If you chose 'Selected Range,' you also need to:

Click on the From: Client box and type the client number to start with, or click the ellipses button to search for the client/matter in the Finder window.
Click on the (From) Matter box and type the matter number to start with, or click the ellipses button to search for the client/matter in the Finder window.
Click on the To: Client box and type the client number to end with, or click the ellipses button to search for the client/matter in the Finder window.
Click on the (To) Matter box and type the matter number to end with, or click the ellipses button to search for the client/matter in the Finder window.
-
 To print 'Ready to Print Bill' prebills associated with a particular billing timekeeper:

- Click on Prebills marked 'Ready to Reprint' by: option.
- Click on the Billing Timekeeper option.
- Click on the arrow to open a list of billing timekeepers.
- Scroll through the list and click on the billing timekeeper you want, to select them.
-
Do one of the following:
-
Click on the All Clients / All Matters option to include all clients/matters associated with this billing timekeeper.

- Click on the Selected Range option to select a range of clients/matters associated with this billing timekeeper.
If you chose 'Selected Range,' you also need to:

Click on the From: Client box and type the client number to start with, or click the ellipses button to search for the client/matter in the Finder window.
Click on the (From) Matter box and type the matter number to start with, or click the ellipses button to search for the client/matter in the Finder window.
Click on the To: Client box and type the client number to end with, or click the ellipses button to search for the client/matter in the Finder window.
Click on the (To) Matter box and type the matter number to end with, or click the ellipses button to search for the client/matter in the Finder window.
-
Prebills Selected below
This options replaces the Client/Matter Range option with a spreadsheet that can be used to enter particular prebills to be reprinted by prebill number.
 To reprint specific prebills selected by prebill number:

- Click on Prebills Selected below option.
-
Click on the first Prebill # cell and type the number of the prebill you want to reprint.
The result of the cells are automatically populated with the information from the prebill number you entered.
-
Repeat step b for each prebill you want to reprint.
Note
The system lets you enter a prebill number for a prebill that does not have a status of ‘Ready to Print’ – but the system warns you that the status is not ‘Ready to Print’ and asks if you are sure you want to reprint that prebill before beginning the reprint process.
- Click the Print Bills button to begin the printing process based on the criteria selected.
Tip
After you have printed or exported bills and while you still have the 'Print Bill' window open, you can select to Re-print or Re-export the bills if you experienced a problem with the process. To re-print or re-export the bills, please see the following section.