Expense Entries advanced topics
Editing an Expense Entry
To edit an entry after it has been saved but before it has been posted:
- On the Batch Form, select the entry to be edited.
- Open the entry by selecting Open from the Form menu or by double clicking on the selected entry.
- Edit the entry as necessary.
- Save the form by clicking on the Save icon.
Deleting an Expense Entry
To delete an entry after it has been saved but before it has been posted:
- On the Batch Form, select the entry to be deleted.
- Open the entry by selecting Open from the Form menu or double clicking on the selected entry.
- On the Entry Form menu, select Delete.
Print Edit List
- See Print Edit List
Mark Ready to Post
- Double click on the Folder containing the Batch(es) to be posted.
- Click on the Unposted Batch to be included.
- From the Tools Menu, select Ready To Post.
- An Unposted Batch may also be marked Ready to Post by double clicking on the Batch to open it and then selecting Ready to Post from the Tools menu.
Post
Print Audit List
- See Print Audit List
Print Batch Log
- See Print Log
Purge
Unlock
Matter/Status Lock
A matter’s status in Juris must be ‘O – Open Matter’ or the entry of expenses will not be permitted for the matter. The matter’s lock flag must be: "Allow time and expenses" or "Disallow time, allow expenses" or the entry of expenses will not be permitted for the matter.
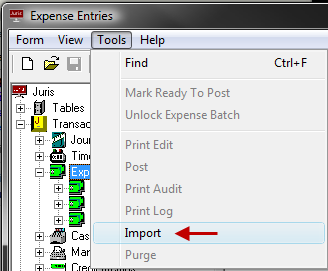
Import Expense Entries
Expenses may be imported into Juris as long as the expense information is formatted according to Juris time import specifications. The file must be in current ASCII delimited or CSV (Comma Separated Variables) format.
-
Select Transactions > Expense Entries.
-
Select Tools > Import from the menu.
-
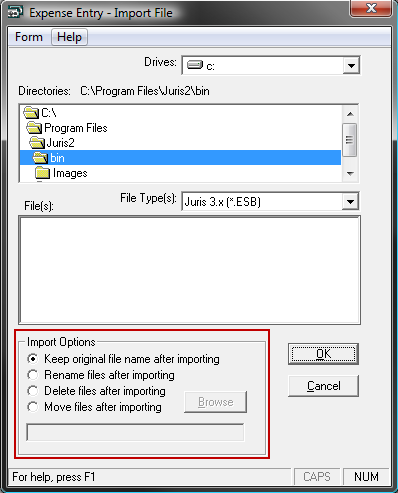
Browse to the import file.
The File Type may need to be changed to view All Files (*.*) in order to select the appropriate file.
Note
On Windows 7, if User Access Control (UAC) is enabled, Juris cannot show mapped network drives while browsing for files to import. This prevents the selection of files on such drives. To work around this limitation, you can temporarily disable UAC on the Windows 7 computer.
Note
Be sure to review the Import Options. The option selected here will determine what action, if any, is to be taken on the imported file(s) after import is complete.
-
Click the OK button to begin the import process.
The expenses are inserted in a new, normal expense batch.