Configure the Billing Tab
NOTE: Remember to click the Save icon to retain any changes made.
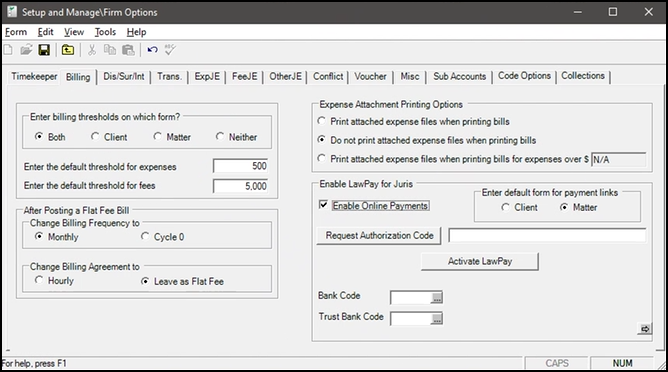
Enter billing thresholds on which form?
Billing thresholds can be set to Both, Client, Matter or Neither. In all cases, the threshold values default to the amounts entered on the billing tab in Firm Options.
- When set to Both, that amount may be changed at the Client or Matter level.
- When set to Client, the amount may be changed at the Client level. The value entered on the Client will be used as the default for all Matters for that Client.
- When set to Matter, the system will allow the amount to be changed on the individual Matters.
- When set to Neither, the system will not allow the threshold amounts to be changed.
Enter the default threshold for expenses.
The amount entered here will be used as the default threshold amount for expenses.
Enter the default threshold for fees.
The amount entered here will be used as the default threshold amount for fees.
After posting a Flat Fee Bill:
Change Billing Frequency to
May be set to Monthly or Cycle 0. When set to Monthly, then after posting the first flat fee bill, the system will set those matters to a Monthly billing frequency, which will include the matter for billing whenever monthly bills are selected. When set to Cycle 0, then the matter will only be included for billing when Cycle 0 bills are selected, which effectively eliminates this matter from billing selection unless Cycle 0 bills are specifically selected.
Change Billing Agreement to
May be set to Hourly or Leave as Flat Fee. If set to Hourly, then the amount charged when bills are selected will be determined by the time entries entered and posted for that matter. If set to Flat Fee, then the Flat Fee amount will be charged each time the matter is selected for billing.
Expense Attachment Printing Options
Select the default setting for expense attachments using the options in the Expense Attachment Printing Options group.
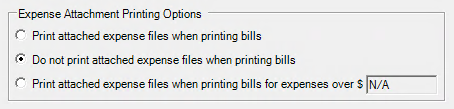
In general, these settings are used to determine what happens to any existing attachment when printing bills. The selected setting is applied as the default setting for all newly defined clients or matters. You can override this setting for a client or matter, as needed.
NOTE: Changes made to the firm options do not automatically update existing clients or matters. To change this setting for existing clients or matters, manually adjust the Bill Attachment setting
Choose one of the following options:
- Print attached expense files when printing bills: All expense attachments are included when printing bills, if present.
- Do not print attached expense files when printing bills: No expense attachments are ever printed with bills.
- Print attached expense files when printing bills for expenses over $: Allows you to specify a dollar amount (in the text box to the right of the option). When a bill is over this amount, any expense attachments are included when printing bills.
Online Payments - LawPay for Juris 4
Clients can make online payments by using an integration when this feature is enabled. Juris sends the billing information LawPay who handles the client's payment, then sends an update to Juris with the transaction details.
The first step is to secure a merchant account with LawPay® (an AffiniPay solution). You will need your LawPay Account sign in information.
To enable the LawPay for Juris 4integration:
-
Select the Enable Online Payments check box.
-
Enter default form for payment links for the firm. The options are Client or Matter. This is a default value and clients can be set as client level or matter level throughout your data.
-
Click Request Authorization Code. This will open a browser for you the login to LawPay. You will be provided an Authorization code.
-
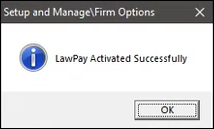
Paste the Authorization Code into the provided field and click Activate LawPay.
-
A message will be displayed once LawPay for Juris 4 is activated.
-
Select theBank Code and Trust Bank Code that are being used with LawPay.
-
Click Save.