Edit Fee and Expense Detail Items
Typing a change directly into a field in edit is an easy way to edit fee or expense details, but what about when the field that needs to be edited is not available on the prebill?
To edit a fee or expense detail item in a prebill:
-
Open the prebill you need to edit.
- Select Billing.
- Click the Edit Prebill icon in the right pane.
- Click on the Prebill # of the prebill you need to edit to select it.
-
Select Form > Open from the menu.
The Billing\Edit Prebill \[prebill number] window opens.

-
Hover in the right margin of a fee or expense entry, and then right-click in the blue area of a selected entry to open a drop-down menu listing all available options.
TIP: Multiple fee or expense details may be selected using Ctrl or Shift while clicking on each entry, so that an option can be applied to multiple entries simultaneously.
-
Select the option that coincides with what you need to do.
(Click on the arrow below that corresponds to your selection, for details about that option.) Edit
Edit
This option opens the detail of the current time or expense entry so that items may be edited.
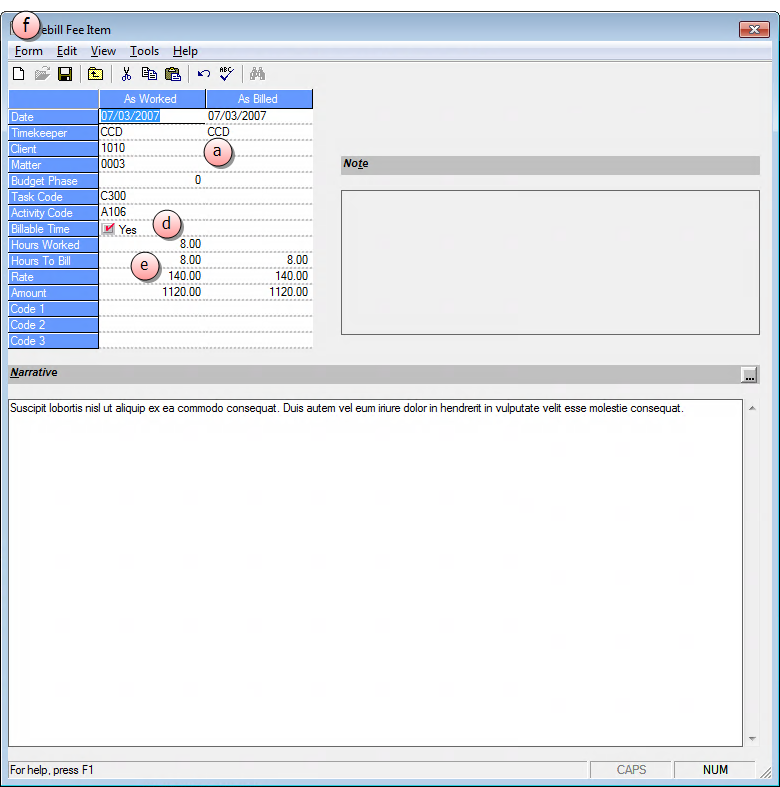
The Time Entry Prebill Fee Item dialog box is shown below.
The Expense Entry Prebill Item dialog box is shown below.
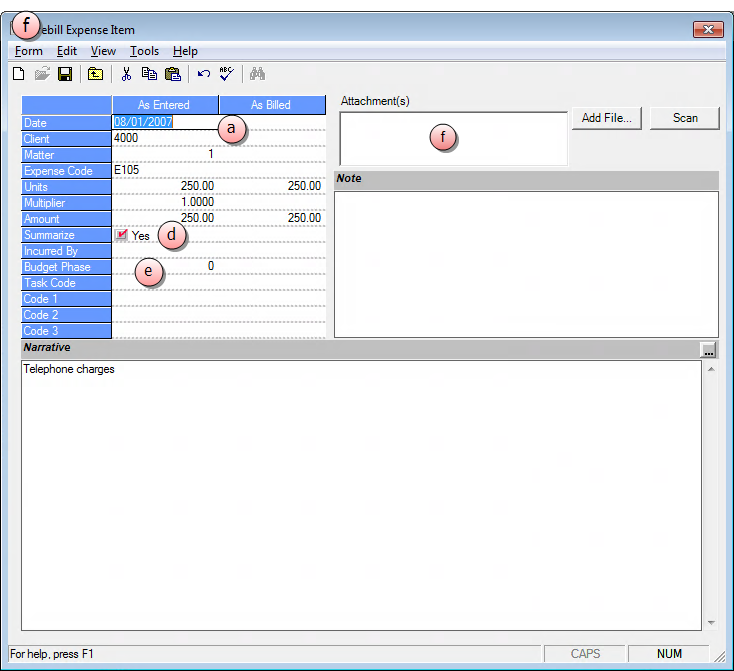
You can choose to edit As Worked, As Entered, or As Billed, depending on your rights and the type of entry (time or expense) you have selected.
- Click on an item to highlight it.
- Type in the new value.
- Repeat steps a and b for each detail item you want to change.
- Optionally, click on the Billable Time check box (to select it) , if you want to add a breakdown by hours. This option is only available when a time entry has been selected.
OR
Click on the Summarize check box (to select it), if you want to add a summary breakdown by budget code. This option is only available when an expense entry was selected. -
Optionally, enter the appropriate breakdown information for the type of entry you are editing (time or expense). This is only necessary if you have selected (checked) the check box in step d above.
- If you are working with an expense, you can add or view attachments using the Attachment(s) text box. For more information, see Using Expense Attachments.
-
Select Form > Save to save your changes, when are you finished with all detail item changes.
Bill
This option is used to indicate that the item is OK to be included and shown on the current bill. This is the default option.
Suppress
This option prevents the Fee or Expense entry from printing on the bill, but the value of the item is still included in the bill’s total.
Hold
This option prevents the Time or Expense entry from being printed on the bill and from being included in Bill balances. The held items still exist in Unbilled Time and Unbilled Expense; and it shows up on the prebill the next time a prebill for that matter is selected, as long as the entry falls within the date range of the selection criteria.
MarkOff
This option marks the entry down to zero. Mark Off entries are suppressed on the bill, and they are not printed.
Delete
This option deletes the item from the bill and from the unbilled tables so that it may not be selected again in the future.
WIP Transfer (Work In Process)
This option can be used to transfer the time or expense entry to another matter. When selected, a Transfer To window opens (see image below).
You must select the Client and Matter to transfer to, and must also determine if the changes should be based on the period of today’s date or the period of the original date of the time or expense entry.

-
In the Client box, type the client code, or click the ellipses button to search for the client in a finder window.
-
In the Matter box, type the matter code for the appropriate matter.
-
Click on the Post changes based on date option you want to use.
If Today’s Date is selected, the system enters the change using the period of the computer’s current system date. Transferring an item in a period other than the current period is only allowed if you have the permission to work in prior periods.
-
Click on the Recalculate based on option you want to use. You can also choose from 3 recalculate options.
- Do not recalculate any entries transfers the item just as it is in the current prebill, regardless of the fee and expense schedules assigned to the new matter.
- Recalculate unless rate or amount were overridden recalculates the entry based on the new matter’s fee or expense schedule, unless the rate or amount for the entry were overridden in Transactions or in Edit Prebills.
- Recalculate all entries – including user overridden rates and amounts recalculates all entries based on the new matter’s fee or expense schedule.
-
Click OK.
A WIP Transfer General Warning window opens.
-
Click Yes to continue.
You are asked if you want to add the entry (or entries) to the existing prebill.
-
Click Yes to add the entry to the existing Prebill.
The line item is removed from the prebill.
NOTE: Multiple items may be selected for Edit, Bill, Suppress, Hold, Mark Off, Delete, or WIP Transfer. To do this, hold thee Ctrl or Shift key while clicking on the blue handle to the left of each item. After all items have been selected, select the option to apply (Edit, Bill, Suppress, Hold, Mark Off, Delete, or WIP Transfer). You can only click on multiple items within the same group; the system does not allow items in different groups to be simultaneously selected.
Quick Sort
The sort option lets you modify the sorting for the items on that particular bill. When select, the Sort/Group options window shows the sorting as defined by the bill format. You can modify the sorting if needed. When you modify, it only affects the current bill; it does not change the sorting on the bill format.

-
Do any of the following, depending on the fields you want to sort by, and the sort order of each field.
- Too add a field, click on the name in the Available Sort Fields list, and then click the right arrow button to add it to the Sort By list.
- To remove a field, click on the name in the Sort By list, and then click the left arrow button to move it to the Available Sort Fields list.
- To move a field up in the Sort By list click on the field to select it, and then click the U button.
- To move a field down in the Sort By list iclick on the field to select it, and then click the D button.
- To use the original sorting selections click on the Use Original Sorting check box to select it. All selections are disabled, meaning they cannot be selected, and only the original sort by fields are used in the sort.
- Click Apply to apply your changes, or OK to apply them and close the window.
Add Fee Item
This option opens a blank fee detail window. You can create a new fee entry to add to the bill by filling out the form and saving it. The client and matter default to the current matter, but on a consolidated bill, the matter may be changed to any matter included in the prebill.
You can choose to edit As Worked or As Billed, depending on your rights.
- Click on an item to highlight it.
- Type in the new value.
- Repeat steps a and b for each detail item you want to change.
- Optionally, click on the Billable Time check box (to select it) , if you want to add a breakdown by hours.
-
Optionally, enter the appropriate breakdown information for the type of entry you are editing (time or expense). This is only necessary if you have selected (checked) the check box in step d above.
-
Select Form > Save to save your changes, when are you finished with all detail item changes.
Add Expense Item
This option opens a blank expense detail window. You can create a new expense entry to add to the bill by filling out the form and saving it. The client and matter default to the current matter, but on a consolidated bill, the matter may be changed to any matter included in the prebill.
You can choose to edit As Entered or As Billed, depending on your rights.
- Click on an item to highlight it.
- Type in the new value.
- Repeat steps a and b for each detail item you want to change.
- Click on the Summarize check box (to select it), if you want to add a summary breakdown by budget code.
-
Optionally, enter the appropriate breakdown information for the entry you are editing. This is only necessary if you have selected (checked) the check box in step d above.
-
If you are working with an expense, you can add or view attachments using the Attachment(s) text box. For more information, see Using Expense Attachments.
-
Select Form > Save to save your changes, when are you finished with all detail item changes.