Export and Email Bills
Export & E-mail Bills is used to generate an electronic copy of a final bill in the following formats: PDF, HTML, LEDES 1998B, RTF, TIFF, or TXT. The electronic file may be saved to a folder on your local hard drive, on a shared network drive (Export), or automatically attached to an email and sent to the client (email). The email feature requires a MAPI-compliant email package, such as Outlook to be installed on the machine performing this task.
You are not limited to only exporting or only emailing each bill. Both an Export format and an email format may be assigned to a consolidation or matter. Juris exports and emails each bill simultaneously.
Billing Address Setup for Emailing Bills
When setting up clients for emailing billing, you must add an email address for the client. This is done in the Billing Address\Office window which can be accessed via the Tables > Client window.
NOTE: In order for the email bills feature to work, you must include the client's email address. A client's email address can be entered in the Billing Address\Office window which is accessed via Tables > Client. See Billing Address Setup for E-mailing Bills for details.
To export and email bills:
-
Double-click Billing.

-
Double-click the Export & E-mail Bills icon.
The Billing\Export & E-mail Bills window opens.

-
Click on the Date option you want to use for the billing date. Options are:
- Use this Date for bills - select this option to define a specific date to use.
- Use date assigned in edit prebill - select this option to use the date that was assigned in the prebill.
- Use date assigned as "Bill Through" date - select this option to use the date that was setup as the Bill Through date.
-
Click on the Select option that corresponds to the bills you want to export or email:
All Prebills marked 'Ready to Print Bill'
This option selects all prebills that have a status of 'Ready to Reprint' in Edit Prebills, or all prebills with a status of 'Ready to Reprint' within a selected client/matter range.
 To select all 'Ready to Print Bill' Prebills, for All Clients and Matters:

- Click on All Prebills marked 'Ready to Print Bill' option.
- Click on the All Clients / All Matters option.
To select all 'Ready to Print Bill' Prebills, for a Range of Clients/Matters:

- Click on All Prebills marked 'Ready to Print Bills' option.
- Click on the Selected Range option.
- Click on the From: Client box and type the client number to start with, or click the ellipses button to search for the client/matter in the Finder window.
- Click on the (From) Matter box and type the matter number to start with, or click the ellipses button to search for the client/matter in the Finder window.
- Click on the To: Client box and type the client number to end with, or click the ellipses button to search for the client/matter in the Finder window.
- Click on the (To) Matter box and type the matter number to end with, or click the ellipses button to search for the client/matter in the Finder window.
All Prebills Marked 'Ready to Post'
This option prints all bills that have a status of 'Ready to Post' in Edit Prebills, or all prebills with a status of 'Ready to Post' within a selected client/matter range.
To select all 'Ready to Post' PPPrebills, foA alC clients anM matters:

- Click on All Prebills marked 'Ready to Post' option.
- Click on the All Clients / All Matters option.
To select all 'Ready to Post' Prebills, for a Range of Clients/Matters:

- Click on All Prebills marked 'Ready to Post' option.
- Click on the Selected Range option.
- Click on the From: Client box and type the client number to start with, or click the ellipses button to search for the client/matter in the Finder window.
- Click on the (From) Matter box and type the matter number to start with, or click the ellipses button to search for the client/matter in the Finder window.
- Click on the To: Client box and type the client number to end with, or click the ellipses button to search for the client/matter in the Finder window.
- Click on the (To) Matter box and type the matter number to end with, or click the ellipses button to search for the client/matter in the Finder window.
Prebills marked 'Ready to Print Bill' by:
This option lets you select whether to reprint prebills that were marked ‘Ready to Reprint’ by a particular user or to print prebills of a particular Billing Timekeeper that are marked ‘Ready to Reprint.’
To select 'Ready to Print Bill" Prebills Associated with a Particular User:

- Click on Prebills marked 'Ready to Print Bill' by: option.
- Click on the User option.
- Click on the arrow to open a list of users.
- Scroll through the list and click on the user you want to select them.
-
Do one of the following:
-
Click on the All Clients / All Matters option to include all clients/matters associated with this user.

- Click on the Selected Range option to select a range of clients/matters associated with this user.
If you chose 'Selected Range,' you also need to:

Click on the From: Client box and type the client number to start with, or click the ellipses button to search for the client/matter in the Finder window.
Click on the (From) Matter box and type the matter number to start with, or click the ellipses button to search for the client/matter in the Finder window.
Click on the To: Client box and type the client number to end with, or click the ellipses button to search for the client/matter in the Finder window.
Click on the (To) Matter box and type the matter number to end with, or click the ellipses button to search for the client/matter in the Finder window.
-
To Select 'Ready to Print Bill' Prebills Associated with a Particular Billing Timekeeper:

- Click on Prebills marked 'Ready to Reprint' by: option.
- Click on the Billing Timekeeper option.
- Click on the arrow to open a list of billing timekeepers.
- Scroll through the list and click on the billing timekeeper you want to select them.
-
Do one of the following:
-
Click on the All Clients / All Matters option to include all clients/matters associated with this billing timekeeper.
IMAGE
- Click on the Selected Range option to select a range of clients/matters associated with this billing timekeeper.
If you chose 'Selected Range,' you also need to:
Click on the From: Client box and type the client number to start with, or click the ellipses button to search for the client/matter in the Finder window.
Click on the (From) Matter box and type the matter number to start with, or click the ellipses button to search for the client/matter in the Finder window.
Click on the To: Client box and type the client number to end with, or click the ellipses button to search for the client/matter in the Finder window.
Click on the (To) Matter box and type the matter number to end with, or click the ellipses button to search for the client/matter in the Finder window.
-
-
Click the Get Prebills button to have the system pull all bills that are eligible for Export/E-mail.
NOTE: The Matters and Consolidations must have an Export or E-mail format selected or they will not appear on the list. In addition, the email option requires an e-mail address to be saved on the Billing Address tab of the client..
A list of available prebills displays.

- Optionally, remove the check mark beside any selected bills that should NOT be included in the current Export/E-mail process.
- Click on the E-mail or Export tab and select the applicable options (filename, file type, export file path).
-
Click the Options button.
If You Select the E-mail Tab...
The Options button opens the Export Options window and enables you to select the filename formats to use for the email.

Note that the Export File Path feature is disabled. This is because you have chosen the E-Mail tab.
In this window, you need to create a filename for email bills. This filename may be defined by moving filename options on the From list to the To list. You can select multiple items in any order.
- In the Filename Format From list, click on the first value you want displayed in the email filename.
- Click the right arrow to add the value to the To list.
- Repeat steps a and b for each value you want to add to the email filename format. Values display in the email filename in the order you select them.
- To add ALL values to the To list, click the double-right arrow button.
- To remove a value, click on it in the To list and click the left arrow button.
- To remove ALL values from the To list, click the double-left arrow button.
Click OK when finished with all your selections.
Your selections are added to the E-Mail Attachment Name Options area of the E-Mail tab.

NOTE: In addition to having a file type assigned, the Billing Address used must also have an e-mail address assigned in order for E-mail Bills to function. For details on setting up the billing address for emailing bills, see Billing Address setup for E-mailing Bills below.
If You Select the Export Tab...
the Options button opens the Export Options window and enables you to enter or Browse for a location to place the exported file.

Warning: It is important to include unique information in the export file name. If there is not at least one component in the filename that identifies it uniquely, the system may create more than one invoice with the same filename. If that occurs, the system saves over that file. For example, if you select only the User Defined field to be used for the filename. Subsequently the user exports 50 bills. As each bill is exported, the system attempts to save to the same location with the same filename, essentially overwriting the file each time. The result is that only 1 file, the last file exported, is left after the 50 exports are complete. To assure that this does not happen - always use at least one unique identifier (preferably Bill Number) to assure a unique filename for each export.
-
In the Export File Path box, type the file path and folder where you want to save the file,
OR click the Browse button to select the path and folder from the Browse for Folder window.
This option is only available for Export Bills, and is the location on the hard drive or network drive where the exported bill is to be saved. You must define this location.
Next you need to create a filename for both the exported bills. This filename may be defined by moving filename options on the From list to the To list. You can select multiple items in any order.
- In the Filename Format From list, click on the first value you want displayed in the export filename.
- Click the right arrow to add the value to the To list.
-
Repeat steps b and c for each value you want to add to the export filename. Values display in the export filename in the order you select them.
The word (Bill) is always included at the end of the filename.
- To add ALL values to the To list, click the double-right arrow button.
- To remove a value, click on it in the To list and click the left arrow button.
- To remove ALL values from the To list, click the double-left arrow button.
-
Click OK when finished with all your selections.
Your selections are added to the Export Options area of the Export tab.

If You Select the Export OR E-Mail Tab and Want to Add Your Own Text to the File Name...
the Options button opens the Export Options window. Depending on which tab your choose, enter the applicable options as stated above to either E-Mail or Export of the bills. To add specific text to the filename, follow the additional steps below.

- In the From list, click on the User Defined value to select it.
- Click the right arrow to add the value to the To list. This value must be added if you want to include your own text in the filename.
-
In the User Defined Text box, type the value you want to add to the filename.
In our example, the filename will be Bill Number, followed by Client Code, followed by Matter Code, followed by the User Defined Text. Given the following information:
Bill Number 12578
Client 1000 - American Capital Corporation
Matter 0800 - HR-Retainer
[user defined text]
BillThe filename created on the exported or emailed file would be:
12578 - 1000 - 0800 - Chowder & Crumb, LLC. (Bill).(file extension)Where .(file extension) is the filename extension as defined by the file format (XLX, TXT, HTM, RTF, PDF, TIF). The word (Bill) is always included at the end of the filename.
In our example, we chose to "export" to a file.
Warning: It is important to include unique information in the export file name. If there is not at least one component in the filename that identifies it uniquely, the system may create more than one invoice with the same filename. If that occurs, the system saves over that file. For example, if you select only the User Defined field to be used for the filename. Subsequently the user exports 50 bills. As each bill is exported, the system attempts to save to the same location with the same filename, essentially overwriting the file each time. The result is that only 1 file, the last file exported, is left after the 50 exports are complete. To assure that this does not happen - always use at least one unique identifier (preferably Bill Number) to assure a unique filename for each export.
-
Click OK when finished with all your selections.
Your selections are added to the Export Options (or E-Mail Attachment Options) area of the Export or E-Mail tab.

- Click the Export/Email button in the Billing\Export & E-Mail Bills window to begin the process.
Certain settings must be made on a Matter prior to exporting bills from Juris. On the ‘Send Copy To’ list there is a drop-down list for file types available for bill export. The ‘Send Copy To’ list can be found on the Address tab for single matters.
NOTE: A file type for the export file must be selected from the drop-down in order to export bills to a file. Matters with the export option set equal to NONE do not show up in the Export Selection window when the 'Get Prebills' button is clicked on in Export/E-mail Bills.
Single Matter
To select a file type on a single matter:

- Click on the Address tab.
- Click on the E-mail and Export arrow and select the file type you want to use from the list.
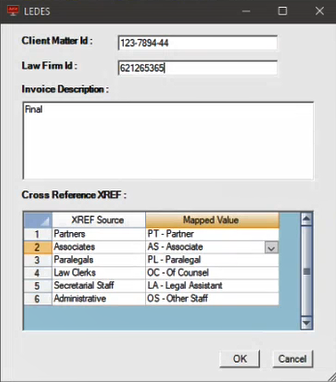
- If you choose to Export a LEDES 1998B file, click the LEDES button that displays after the file type selection, and confirm the Client Matter ID, Law Firm ID, and Cross References XREF values have been set.
- Click the Save button to save the file type(s) you have selected.
-
Select Tables > Client to open the list of clients on the right.

-
Double-click on the client name to open the Clients\[client code] window.

-
Double-click the Billing Address icon at the bottom of the window.
A Billing Address selection window opens.

-
Double-click on the Nickname of the billing address you want to setup for email.
For client's with only one address, the nickname is "Main."
A Billing Address\'Main' (or which ever nickname you selected) window opens.

- In the E-mail Address box, type in the email address to which the bill should be emailed.
- Click Save to save the email address.