Unpost a Manual Bill
A bill to which cash, a credit memo or a trust adjustment has been applied.
The following procedure can be used to unpost manual bills. If you need to find out what has been applied to a bill, go to Client/Matter Inquiry and review the Ledger History or Bill.
NOTE: You cannot "unpost" a manual bill. Instead, you have to reverse it. Below is the procedure for reversing a manual bill, or for reversing a bill to which cash, a credit memo or a trust adjustment has been applied.
There are two main steps to reversing a manual bill:
- First, create a negative manual bill to negate the original manual bill.
- Second, create a zero dollar cash receipt to prevent both manual bills from showing up on your Aged A/R Analysis reports.
Create a Negative Manual Bill
To create the negative manual bill:
- Start Juris and log in to open the main Juris window.
- Double-click Transactions to expand the folder.
- Click Manual Bills.
-
Select Form > New >Manual Bill on the menu to open a new batch window.

- In the Batch Comment box, type a name for this batch, or skip this step to accept the default.
-
Select Form > New on the menu to open a new manual bill window.
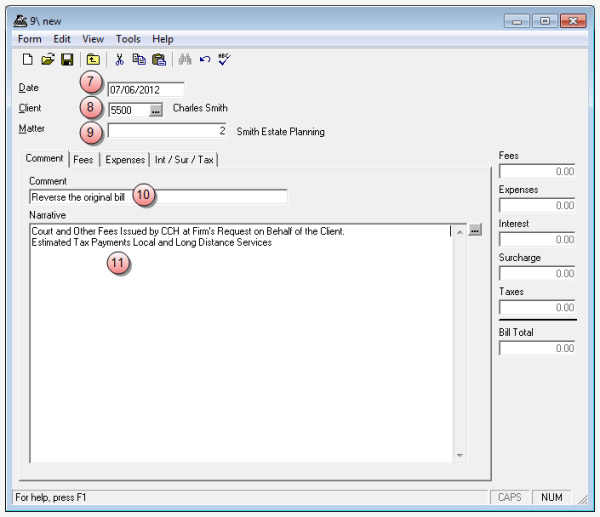
- In the Date box, type the date of the original manual bill that you want to reverse.
- In the Client box, type the client number from the original bill.
- In the Matter box, type the matter number from the original bill.
- In the Comment box, type the reason for this manual bill reversal.
- In the Narrative box, type the narrative(s) from the original manual bill, or click the ... (ellipses) button to select from a list.
-
Click on each of the following tabs that apply, and enter the opposite allocations from those allocated on the original manual bill.
 If allocations were made on the Fees tab in the original manual bill, make the reverse allocations on this tab.

- Click the Fees tab, if not already selected.
- In the ID column, type the timekeeper ID as listed on the original manual bill.
- In the Fee Amount column, type a "negative' amount that equals what was allocated to this timekeeper on the original manual bill.
- Repeat steps b and c for each timekeeper listed on the original manual bill.
The Name column automatically populates, based on the ID you have entered.
If allocations were made on the Expenses tab in the original manual bill, make the reverse allocations on this tab.

- Click the Expenses tab.
- In the Exp. Code column, type the same expense code as listed on the original manual bill. The Description column automatically populates based on the expense code you have entered.
- In the Exp. Amount column, type a "negative" amount that equals what was allocated to this expense code on the original cash receipt.
- Repeat steps b and c for each expense code listed on the original manual bill.
If allocations were made on the Int / Sur / Tax tab in the original manual bill, make the reverse allocations on this tab.

- Click the Int / Sur / Tax tab.
- In the Interest box, type a "negative" amount that equals the interest amount allocated on the original manual bill.
- In the Surcharge box, type a "negative" amount that equals the surcharge amount allocated on the original manual bill.
NOTE: It is good practice to verify your entries before you save, as the manual bills are automatically posted when you save.
-
Select Form > Save on the menu to save and post the manual bill.
You are ready to create the zero dollar cash receipt.

Create a Zero Dollar Cash Receipt
Create a zero dollar Cash Receipt ($0) with both the positive and negative manual bills brought in under the A/R tab. Apply a positive amount to the positive manual bill and a negative amount to the negative manual bill to create a cash receipt total of zero dollars ($0)
To create the zero dollar cash receipt:
-
Double-click Transactions to expand the folder if not already expanded.

- Click Cash Receipts.
-
Select Form > New > Cash Receipt on the menu to open a new batch window.
- In the Batch Comment box, type a name for this batch, or skip this step to accept the default.
-
Select Form > New on the menu to open a new cash receipts window.

- In the Deposit Date box, accept the default of today's date.
- In the Check Number box, type a check number.
- In the Check Date box, accept the default of today's date .
- In the Check Amount box, ensure that the dollar amount is 0.00.
- In the Payor box, do not type anything. The payor is automatically populated with the client name when you enter the client code below.
- Click the A/R tab, if not already selected.
- In the Client column, type the client number from the original manual bill.
- In the Matter column, type the matter number from the original manual bill.
- Right-click in the Bill# column, and select the original manual bill from the list.
- In the Apply column, type the same amount as the amount from the original bill. This should be a "positive" amount on both the original bill and in this column.
- Repeat steps 13 through 15, only this time select the reverse (negative) bill from the 'Bill #' list, and enter the same amount as shown on that bill as a "negative" under the 'Apply' column.
- Ensure that the Amount Applied, Balance to Apply, and Batch Total boxes are all 0.00 amounts.
- Select Form > Save on the menu to save the cash receipt.
-
Click the window Close button to close the cash receipt window.
You are returned to the batch window.
- Click the window Close button to close the batch window.
- Post the cash receipt. See Post a transaction batch for instructions.
Related information