Detaching or Attaching a Juris Database
Caution: The detach and attach functions are not compatible with SQL 2008 and SQL Express 2008.
Detach
This function allows the detachment of the Juris database (and JBills if applicable) so it can be moved to another location when/if necessary. A database must be detached before it can be moved, copied, renamed or zipped. This is not the same as backing up a Juris database.
To Detach a Juris database, perform the following:
- Click the Detach link in the Database Utilities section of the Juris Management Console. See Figure 1.0
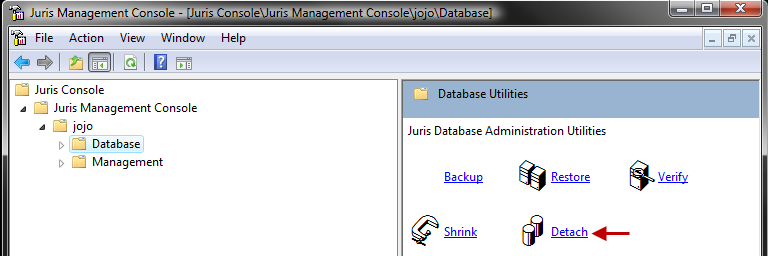 Figure 1.0
 - Click the Next arrow. See Figure 2.0
 Figure 2.0
 - This screen will confirm the detachment of the database selected prior
to selecting the Detach option. If the information is correct, click Finish
to detach the database. See Figure 3.0
 Figure 3.0
 - If someone is still logged into Juris, you will receive an error message stating the database is open. At this point, you cannot continue until all users are out of Juris. Make sure everyone is out of Juris and continue with the Detach function.
- A report automatically displays at the end of the procedure. It
contains information on the Juris database and also the JBills (archived
bills) file if applicable. It
may be printed if needed for record keeping. See Figure 4.0
 Figure 4.0
Attaching a Juris Database
If a database was previously detached (using the Detach utility), the Attach utility reattaches it to Juris. This attachment includes the Juris database as well as Jbills, if applicable.
Note: The Attach option is only available on a database that is currently detached. So if you go to the ManagementConsole and go to the Database Utilities for a database that has not been detached, you will not see the Attach icon.
- Double click the Attach icon
to start the wizard. The first screen is shown below. Click the right
arrow to continue. See Figure 5.0
 Figure 5.0
- This screen will confirm the database file and log which are about to
be attached. If
the default is not the correct database, you can use the browse […] button
to find the correct files. Once the information is correct, click the
right arrow to continue. See Figure 6.0
 Figure 6.0
- This screen will confirm the JBills file and log which are about to
be attached along with the previously selected database. If the default
is not correct, you can use the browse […] button to find the correct JBills
files. Once the information is correct, click the right arrow to continue. See Figure 7.0
 See Figure 7.0
 - This screen will confirm the attachment of the files previously selected.
If the information is correct, click Finish to attach the database and
jbills.
 Figures 8.0
 - A report automatically displays at the end of the procedure. It contains information on the Juris database and also the JBills (archived bills) file if applicable. It may be printed if needed for record keeping. See Figure 9.0
 Figure 9.0
 Related Topics