Print/post checks
Note
After the checks have been selected, you may alter the payment amount or discount amount by typing in the desired values over the existing values. The check amount will recalculate based on the changes made. In addition, items may be removed from the check selection. See Remove a voucher for details.
Before printing checks, you may want to view, print or download a file containing information from your check register prior to printing checks; this is called a pre check register. In addition, after printing your checks you may want to view, print of download a file of the actual check register. Note that you can only print a check register after you have printed the checks, while a pre check register can be accessed prior to printing the checks.
What would you like to do?
Print a pre check register
To print a pre-check register:
- Open the batch that contains the checks for which you want to view the pre check register.
-
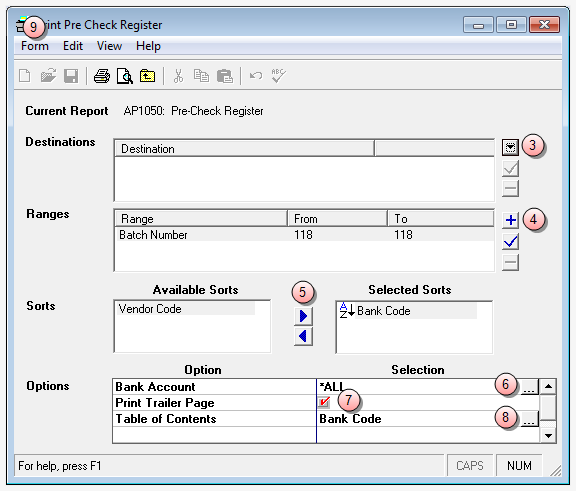
Select Form > Print > Pre Check Register in the batch window, to open the Print Pre Check Register window.

Print options shown here are the typical report options available on all Juris reports. You can either change these options as stated in steps 4 through 8, or accept the defaults.
- Click on the Destination down-arrow in the Destinations panel, and select where you want to send the pre check register report.
- In the Ranges panel, accept the default or select the range(s) of checks you want in the pre check register report by clicking on the plus sign button.
-
In the Sorts panel, accept the default or click on the Available Sorts option you want to use and then click the forward arrow.
To remove a selection from the Selected Sorts pane, click on it and then click the back arrow.
- (Optional) Click on the Bank Account ellipses button in the Options panel, to select the bank you want, or accept the default of ALL banks.
- (Optional) Click on the Print Trailer Page check box to remove the check, if you prefer not to print a trailer page at the end of your report.
- (Optional) Click on the Table of Contents ellipses button to change your selection, or accept the default.
-
Select Form > Print to begin printing to the destination you chose in step 3.
If you chose to print to a printer in step 3, you may want to select Print Preview to view the report on screen before printing.
Print and post checks
To print and post checks:
- Open the batch that contains the checks you want to print.
-
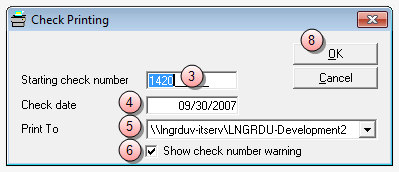
Select Form > Print > Checks in the batch window, to open the Check Printing window.

-
In the Starting check number box, accept the default or type in the check number you want to use for the first check.
All other checks are numbered sequentially from the first check number.
- In the Check date box, accept the default or type the date you want printed on the check(s).
- Click on the Print To down-arrow , and select the printer you want to print the check to.
- In the Show check number warning check box, accept the default of "selected" (checked), or if you do not want to be warned that a check number was already used, click on the check box to remove the check.
- Load check paper in the printer before continuing.
-
Click OK to begin printing the checks.
Once all checks have been printed you are ready to post the checks.
-
Click Form > Post Checks from the batch window, to post the checks.
These checks are now included in your check register, should you want to view or print your check register.
Print a check register
To print a check register:
- Open the batch that contains the checks for which you want to view the check register.
-
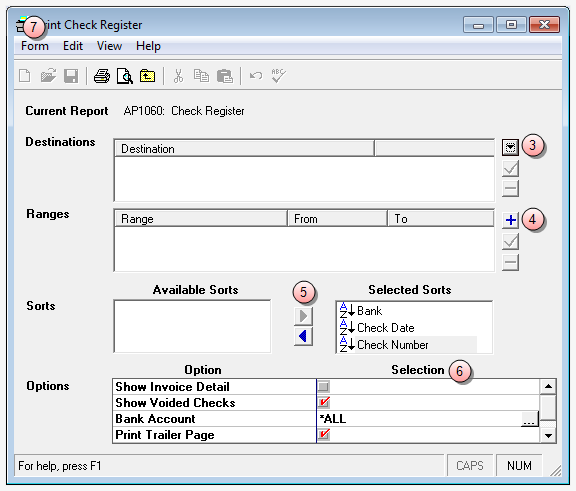
Select Form > Print > Check Register from the batch window, to open the Print Check Register window.

- Click on the Destination down-arrow in the Destinations panel, and select where you want to send the pre check register report.
- In the Ranges panel, accept the default or select the range(s) of checks you want in the pre check register report by clicking on the plus sign button.
-
In the Sorts panel, accept the default or click on the Available Sorts option you want to use and then click the forward arrow.
To remove a selection from the Selected Sorts pane, click on it and then click the back arrow.
- In the Options panel, accept the defaults or use the ellipses buttons to change selections where appropriate and click on the check boxes to toggle an option on or off. For check boxes, a check indicates that the options is turned on, or selected.
-
Select Form > Print to begin printing to the destination you chose in step 3.
If you chose to print to a printer in step 3, you may want to select Print Preview to view the report on screen before printing.