Transfer prepaid (PPD) to trust
Transferring funds from a prepaid account to a trust account is a three step process:
- Step 1: Remove the funds from the prepaid account
- Step 2: Transfer the funds
- Step 3: Receive the funds into the trust account
Remove funds from prepaid
The first step in transferring funds from prepaid to trust is to remove the funds from the prepaid account. To do this, you create a "cash receipt" with a "zero" ($0.00) check amount, a "negative" PPD dollar amount, and an equal "positive" Other dollar amount.
To reverse a prepaid amount:
-
Start Juris and log in, to open the main Juris window.
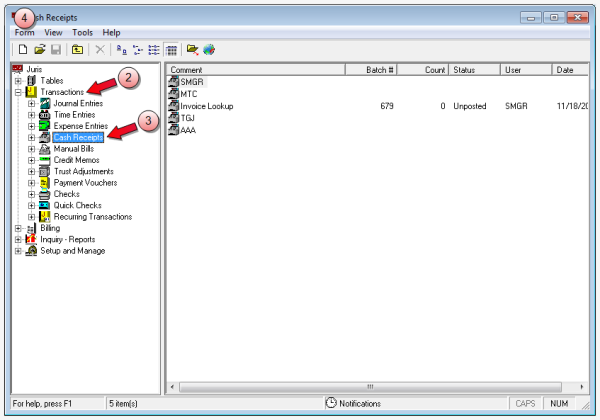
- Double-click Transactions, to expand the folder.
- Click Cash Receipts.
-
Select Form > New > Cash Receipt on the menu, to open a new batch window.
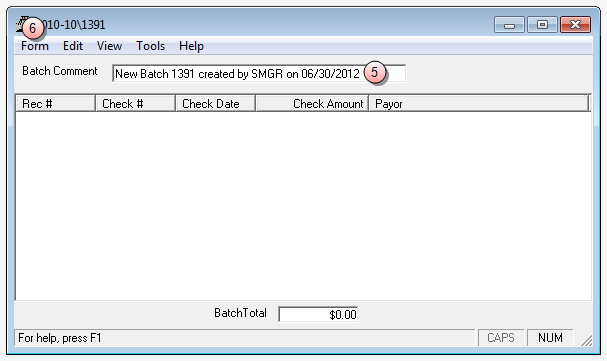
- In the Batch Comment box, type a name for this batch, or skip this step to accept the default.
-
Select Form > New on the menu, to open a new cash receipts window.
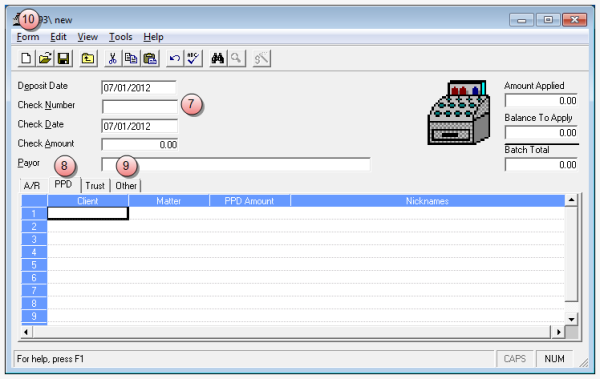
- In the Check Number box, type the check number you want to use.
-
Click the PPD tab, and enter the client and matter information, along with a "negative" PPD dollar amount.
 PPD tab steps
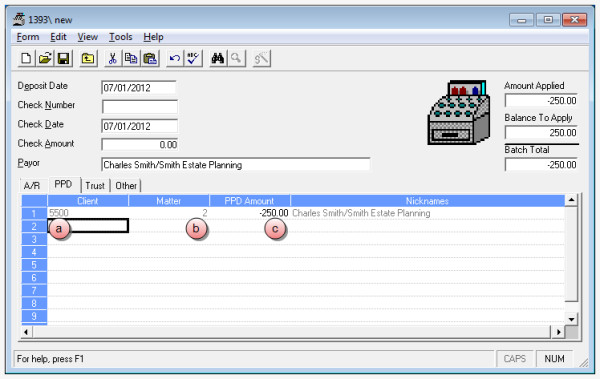
- In the Client column, type the client number.
- In the Matter column, type the matter number.
- In the PPD Amount column, type the amount to be transferred, as a "negative" amount.
-
Click the Other tab, and enter the bank code, account number, and the same dollar amount as on the PPD tab, but as a "positive" amount.
 Other tab steps
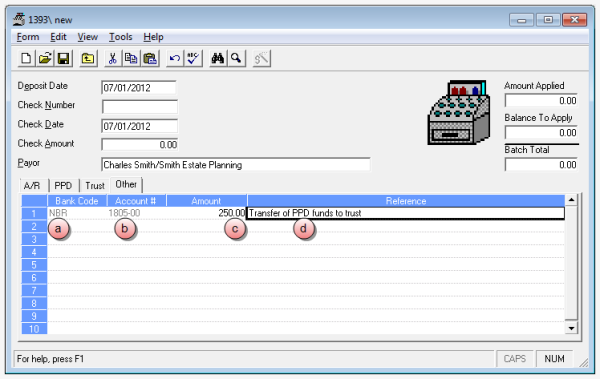
- In the Bank Code column, type the bank account that you want to transfer money from, or right-click in the column row to open a Bank Account Finder window in which you can select the bank account.
- In the Account # column, type the G/L account number, or right-click in the column row to open the Chart of Accounts Finder window where you can search for, and select the code.
- In the Amount column, type the same amount as you entered on the PPD tab, but as a "positive" dollar amount.
- In the Reference column, type a short description for the action.
Important!
Do not enter the account number in the Bank Code box.
- Select Form > Save on the menu, to save the cash receipt.
- Click the window Close button, to close the cash receipt window.
- Select Tools > Ready to Post on the menu in the batch window, to prepare the cash receipt for posting.
- Click the window Close button on the batch window, to close it.
-
Post the cash receipt batch. See Post a transaction batch for instructions.
You are ready to transfer the funds.
Transfer funds
The second step in transferring funds from prepaid to trust is to create a quick check that can then be received into the trust account.
To create the PPD transfer quick check:
- Ensure that you are back at the main Juris window.
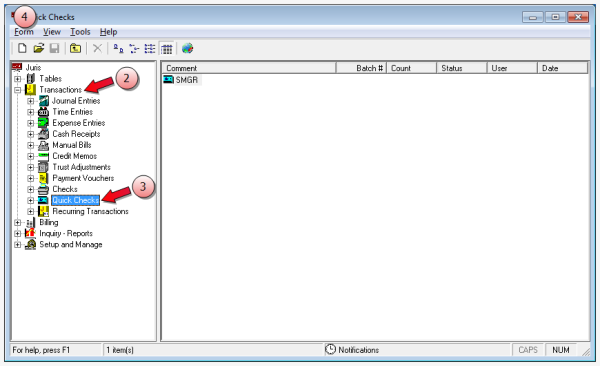
- Double-click Transactions, to expand the folder.
-
Click Quick Checks.
Tip
Quick Checks allows you to enter a check and a voucher simultaneously.
-
Select Form > New > Quick Check on the menu, to open a new batch window.
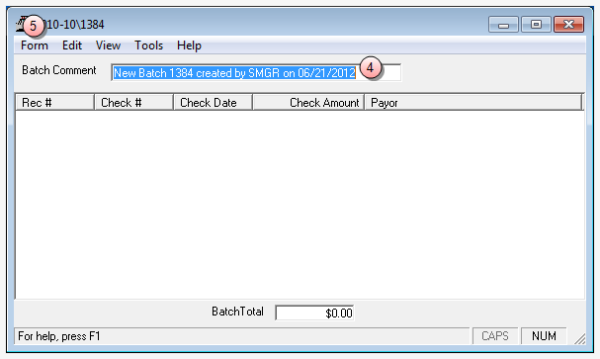
- In the Batch Comment box, type a name for this batch, or skip this step to accept the default.
-
Select Form > New on the menu, to open the Quick Check window.
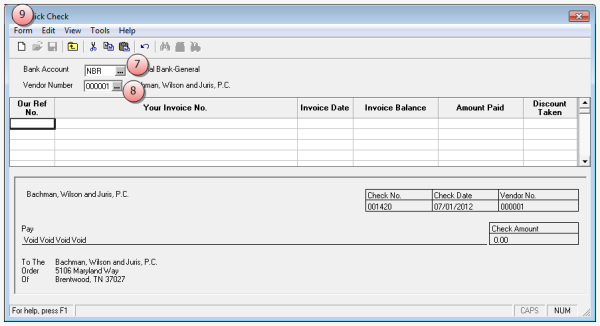
- In the Bank Account box, type the bank account from which you want to transfer prepaid funds, or click the ... (ellipses) button to select it from a list.
- In the Vendor Number box, type your firm vendor number, to create a check to the firm.
- Select Form > New on the menu, to add a new row in which to enter a payment.
-
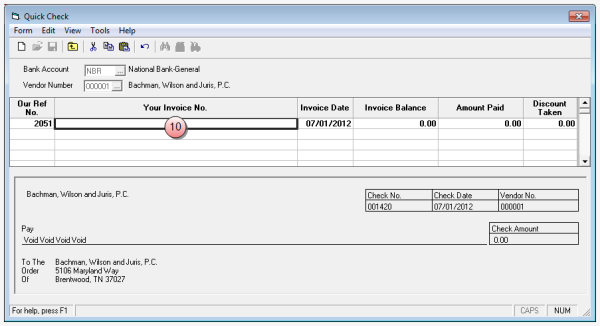
Double-click the Your Invoice No. column, to open the Quick Checks detailed voucher window.
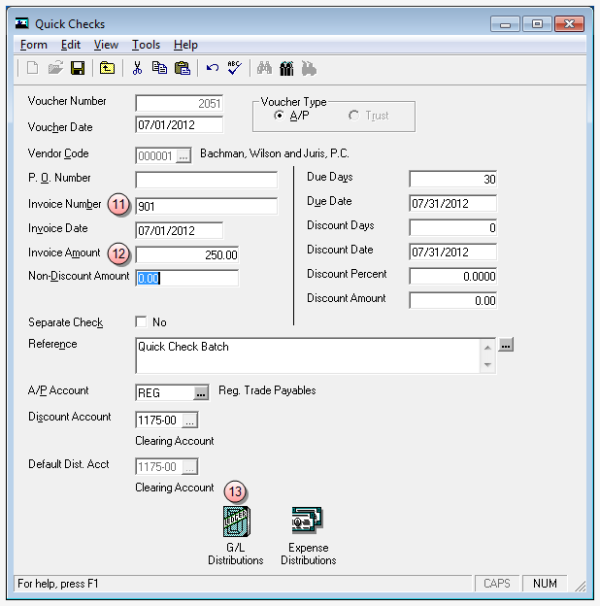
- In the Invoice Number box, type the invoice number you want to use for this voucher.
- In the Invoice Amount box, type the amount you are transferring.
-
Double-click the G/L Distributions icon at the bottom of the detailed voucher window, enter the cash receipt G/L account and the amount you are transferring.
 G/L distriburtion steps
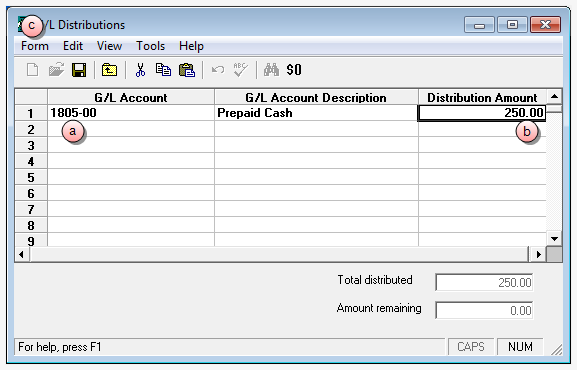
- In the G/L Account column, type the cash receipt G/L account number.
- In the Distribution Amount column, type the check amount.
- Select Form > Save on the menu, to save the G/L distributions, and return to the detailed voucher window.
This should be the same account number that you entered in the 'Account #' column, on the Other tab in the Cash Receipt.
This should be the same dollar amount that you entered in the 'Amount' column, on the Other tab in the Cash Receipt.
- Take note of the check number and ensure that it is the same as the number on your check stock.
- Select Form > Save on the menu in the detailed voucher window, to save your entries.
- Click the window Close button, to close the detailed voucher window.
-
Select Form > Save on the menu.
A Check Printing window opens.
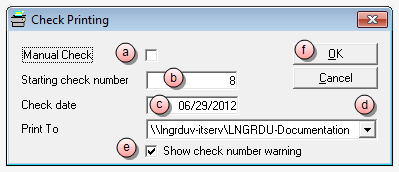
- (Optional) Select the Manual Check check box, if you intend to hand-write a check. Ensure that the check box is NOT selected if you intend to print the check.
- In the Check Number box, verify that the starting check number is correct, or if hand-writing a check, type in the check number.
- In the Check date box, type a date, or use the default (today's date.)
- Click the Print To arrow, to select the printer where you want to print the check.
- Ensure that the Show check number warning check box is selected, if you want the system to warn you if the starting check number is out of sequence.
- Click OK.
Note
If you are printing the check(s), ensure that you have check stock in the selected printer before you click the OK button, as the check(s) start printing immediately.
- Click the window Close button on the Quick Check window, to close it.
-
Click the window Close button on the Quick Checks batch window, to close it.
The process is complete. Now you can move on to the third and final step - receiving the funds into the trust account.
This action lets you setup a new payment voucher.
Note
The program credits and debits the account you used for the G/L Distribution and the Cash Receipt. The credit comes from the Cash Receipt you entered and the debit comes from the check you write.
The quick check is populated with the information you entered in the detailed voucher window.
Receive funds into trust
The third, and final step in transferring funds from prepaid to trust, is to create a cash receipt in order to post the quick check to the trust account.
-
Ensure you are at the main Juris window.

- Double-click Transactions, to expand the folder.
- Click Cash Receipts.
-
Select Form > New > Cash Receipt on the menu, to open a new batch window.

- In the Batch Comment box, type a name for this batch, or skip this step to accept the default.
-
Select Form > New on the menu, to open a new cash receipts window.
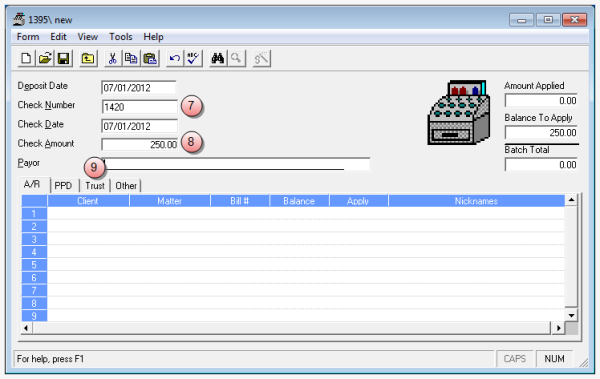
- In the Check Number box, type the check number of the quick check.
-
In the Check Amount box, type the amount of the quick check.
-
Click the Trust tab, and enter the client, matter information, trust bank account, and amount.
 Trust tab steps
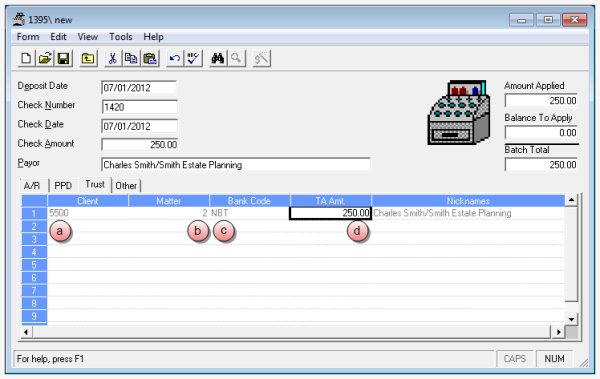
- In the Client column, type the client number.
- In the Matter column, type the matter number.
- In the Bank Code column, type the bank code for the trust bank account.
- In the TA Amt. column, type the amount of the quick check you just created.
- Select Form > Save on the menu, to save the cash receipt.
- Click the window Close button, to close the cash receipt window.
- Select Tools > Ready to Post on the menu in the batch window, to prepare the cash receipt for posting.
- Click the window Close button on the batch window, to close the window.
-
Post the cash receipt batch. See Post a transaction batch for instructions.
The transfer is complete.
Related information
Related tasks
Apply prepaid (PPD) funds to A/R balance