Create a Cash Receipt
To create a cash receipt:
- Start Juris and log in to open the main Juris window.
- Double-click Transactions to expand the folder.
- Click Cash Receipts.
-
Select Form > New > Cash Receipt on the menu to open a new batch window.

- In the Batch Comment box, type a name for this batch (1 - 50 characters), or accept the default.
-
Select Form > New on the menu to open a new cash receipts window.

- In the Deposit Date box, type the deposit date or accept the default.
- In the Check Number box, type the next available check number (1 - 10 alpha-numeric).
-
In the Check Date box, type the date you want to use for the check or accept the default.
NOTE: Dates must fall within the current Accounting Period unless permission to enter dates in any periods is given to the User in the User ID’s-Menu Rights.
- In the Check Amount box, type the amount of the check (0.00 - 99999999.99).
-
In the Payor box, type the name of the person/company to whom the check is to be written (1 - 50 characters).
If Payor is left blank, the Nicknames of the Client/Matter entered in the first row of the A/R or PPD tab is automatically used, depending on the Cash Receipts Preference selected.
TIP: If you need to view a check number in a Client/Matter inquiry, insert the check number first in the Payor box, followed by the name.
-
Follow the steps below that apply to the cash receipt you are creating.
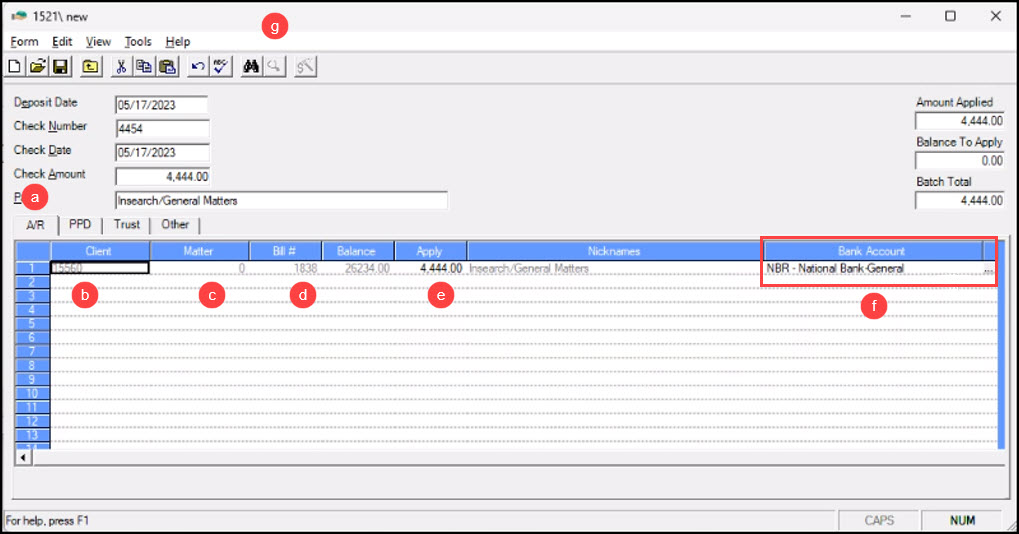
 To apply cash to outstanding invoices, use the A/R tab.

- Click the A/R tab, if not already selected.
- In the Client column, type the client number.
-
In the Matter column, type the matter.
A client and matter can be entered without a bill number.
TIP: You can also click on Tools > Find to search for a client or matter.
-
In the Bill# column, type the same bill number that was entered on the original cash receipt.
A bill number may be entered without entering a client/ matter, if not related to a specific client/matter.
- In the Apply column, type the amount that was received.
-
By default, the Bank Account column will be automatically display the default Bank Account associated with the Matter. You can select a different account to submit the payment to.
NOTE: You need the User is allowed to change Bank Account deposit Menu Right assigned to you from the System Manager. See User Menu Rights to learn more.
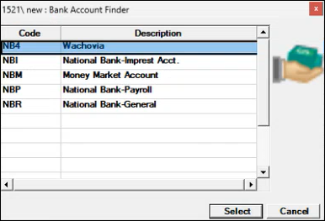
Click the three dots next to the Bank Account column to open the Bank Account Finder window. Click on the account you wish to use and click Select.
- Optionally, click the
 on the toolbar to apply cash to specific timekeepers, expense codes, or to specific expense types (fees, cash expenses, noncash expenses, interest, surcharge.). Use the 'Cash Wizard' to automatically allocate funds.
To apply cash to prepaid, use thePPD tab.

- Click the PPD tab.
- In the Client column, type the client number.
In the Matter column, type the matter number.
TIP: You can also click on Tools > Find to search for a client or matter.
In the PPD Amount column, type the amount that was received.
NOTE: Negative PPD receipts are not allowed if PPD has been applied to a Prebill and the total of the Prebill application and the negative PPD receipt create a negative PPD balance for the matter.
To apply cash to trust, use the Trust tab.
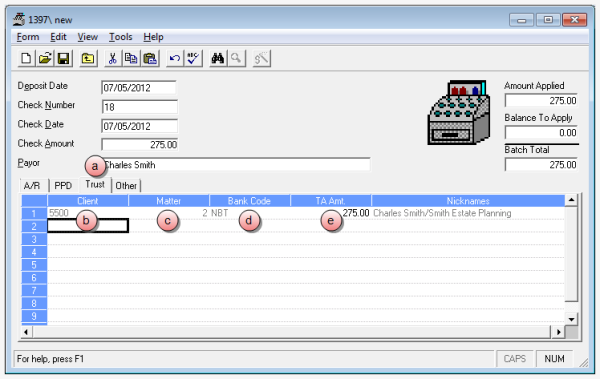
- Click the Trust tab.
- In the Client column, type the client number.
-
In the Matter column, type the matter number.
-
In the Bank Code column, type the number of the Trust bank account to receive the payment.
TIP: You can also click on Tools > Find to search for a client, matter, or bank code.
- In the TA Amt. column, type the amount that was received.
To apply cash not related to a client or matter, use the Other tab.
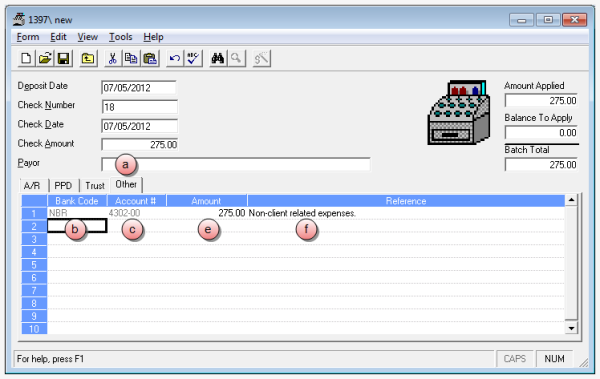
- Click the Other tab.
- In the Bank Code column, type the bank code for the bank to receive the funds.
- In the Account # column, type the G/L account number to which the cash applies.
- In the Amount column, type the amount that was received.
- In the Reference column, type a reference.
-
Select Form > Save on the menu to save the Cash Receipt.
NOTE: The transactions stay in an editable state until posted i.e., UNTIL POSTED, THE TRANSACTIONS ARE NOT FINALIZED. The batch may be set to a status of 'Ready to Post' by selecting that option from the Tools menu. Once marked 'Ready to Post', a user with rights to post must post that batch to finalize the transactions.
-
Post the cash receipt. See Post a transaction batch for instructions.

Related tasks