Apply Trust to A/R Balance, Balance Forward or a Posted Bill
Applying trust funds is a two-step process; first you have to create a quick check for the removal of the funds from the trust account, then you create a cash receipt to add the funds to the A/R balance, balance forward, or posted bill.
You must have rights to post transaction batches in order to complete this task.
Remove Funds From Trust
To remove funds from the trust account:
- Start Juris and log in to open the main Juris window.
- Double-click Transactions to expand the folder.
- Click Quick Checks.
-
Select Form > New > Quick Check on the menu to open a new batch window.

- In the Batch Comment box, type a name for this batch, or skip this step to accept the default.
-
Select Form > New on the menu to open the Quick Check window.

- In the Bank Account box, type the trust bank nickname, or click the ... (ellipses) button to select it from a list.
- In the Vendor Number box, type your firm's vendor number.
- Select Form > New on the menu to add a new row in which to enter a payment.
- In the Client column, type the client number to which the check applies.
- In the Matter column, type the matter number to which the check applies.
- In the Your Invoice No. column, type the invoice number to be used for this check.
- In the Invoice Balance column, type the dollar amount that you need to remove from Trust fund.
- Repeat steps 9 - 13 for each client or matter, if you need to pay the vendor for multiple clients or matters.
-
Select Form > Save on the menu.
A Check Printing window opens.

- Optionally, select the Manual Check check box, if the check was hand-written and is not to be printed.
- In the Check Number box, verify that the starting check number is correct, or if a hand-written check was created, type in the starting check number.
- In the Check date box, verify that the date of the check is correct, especially for a check that has already been written.
- Click the Print To arrow to select the printer where you want to print the check(s).
- Ensure that the Show check number warning check box is selected, if you want the system to warn you if the starting check number is out of sequence.
- Click OK.
NOTE: If you are printing the check(s), ensure that you have check stock in the selected printer before you click the OK button, as the check(s) start printing immediately.
- Click the window Close button to close the Quick Check window and return to the Quick Checks batch window.
- Click the window Close button in the Quick Checks batch window to close it.

This action lets you setup a new payment voucher.
NOTE: When adding a new voucher, you can double-click on the cell under the 'Your Invoice Number' column to open a Quick Checks detailed voucher window. In this window, you can allocate general ledger and expense distributions, if needed.

You are now ready to finish the task by adding the funds to the A/R balance, balance forward, or posted bill.
Add Funds to A/R Balance, Balance Forward or Posted Bill
Add funds to A/R balance, balance forward, or posted bill
- Start Juris and log in to open the main Juris window. Skip this step if you are already logged in.
- Double-click Transactions to expand the folder.
- Click Cash Receipts.
-
Select Form > New > Cash Receipts on the menu to open a new batch window.
- In the Batch Comment box, type a name for this batch, or skip this step to accept the default.
-
Select Form > New on the menu to open a new cash receipts window.

- In the Deposit Date box, type a deposit, or accept the default of today's date.
- In the Check Number box, type the next check number to be issued from the trust account.
- In the Check Date box, type the date you want to use as the official check date.
- In the Check Amount box, type the same dollar amount that you entered on the Quick Check.
- In the Payor box, type your firm's name.
-
Click the A/R tab if not already selected, and enter the same information that you entered in the Quick Check window. Ensure that you enter a "positive" dollar amount in the Apply column.
 A/R tab steps

- In the Client column, type the same client number that you entered on the Quick Check.
- In the Matter column, type the matter number that you entered on the Quick Check.
- Right-click the row's Bill # column to open the Bill Finder window.
- Double-click on the bill to which you need to apply the trust funds.
- In the Apply column, type the amount you want to apply to this bill.
- Repeat steps a - e for each client or matter, if you entered more than one client or matter in the Quick Checks window.
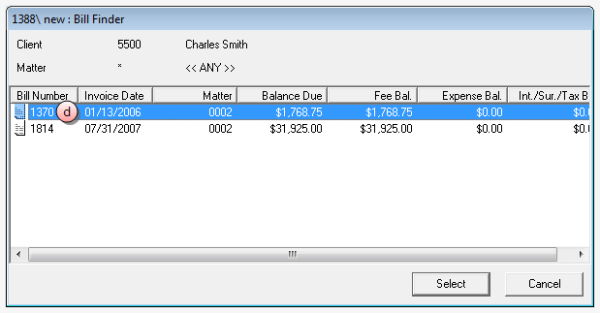
The bill is selected and the Bill Finder window closes. The bill number you have selected, appears in the 'Bill #' column.
- Select Form > Save on the menu to save the Cash Receipt.
- Click the window Close button to close the cash receipt window and return to the batch window.
- Click the window Close button on the batch window to close it.
-
Post the cash receipt. See Post a transaction batch for instructions.
