Creating an Expense Entry
To create an expense entry:
-
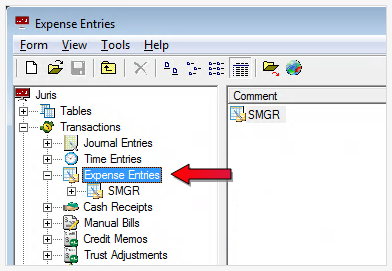
Select Transactions > Expense Entries.
-
Create a new expense batch using any of the options below:
- Click the New icon on the toolbar.
- Select Form > New > Expense Entry from the menu.
The Expense Batch Type dialog box appears.

-
Click the Batch Type you want to create.
- Normal: This is the typically used batch type. When Normal batch is selected, items entered are not finalized until posted. This allows a user to enter items, verify accuracy, and make changes. Once the batch is complete, it will be posted – and the journal entries required are written at that time. After posting, the items will appear on reports, and be included in other transactional processes (check selection, prebill selection, etc.)
- Direct: This type of batch does not require posting. Each item is posted as it is saved. This means that a separate posting step is not required. The entry is finalized as it is saved, writing all journal entries and appearing in reports and other transactional processes. If a change is needed, that change would have to be performed in an adjustment batch.
-
Adjustment: This batch type is used when the user needs to make a change to an item entered in a posted batch (a posted normal batch, or a direct batch). The original item is found, the change is made, and an adjustment is recorded showing the before and after of the change.
Expense batch naming conventions
-
When an expense batch is created in Juris, the Juris system automatically generates the batch name based on the following criteria:
- Next available batch number (consecutive)
- User ID of person creating batch
- Date batch is created
Some firms choose to edit the batch names to something more meaningful in their particular environment – but the default names are extremely descriptive and most firms elect to accept the default naming convention established by Juris.
-
Click OK.
The expense's dialog box appears.
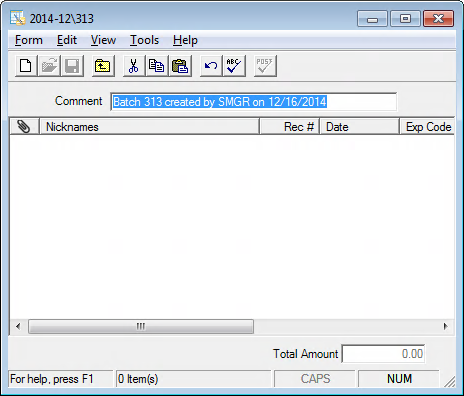
- In the Comment box, type a name for the batch or leave the default.
-
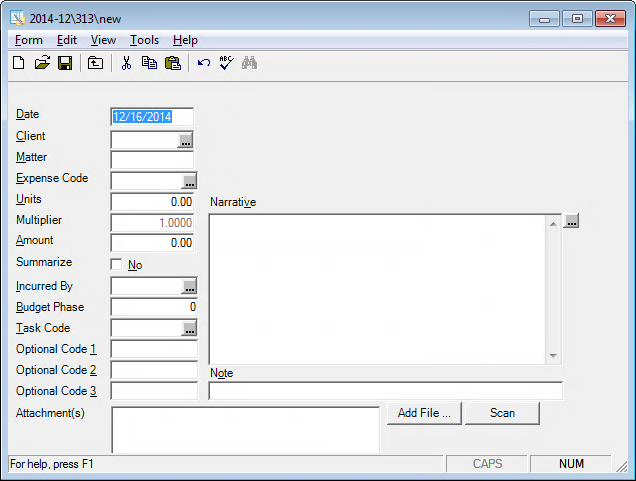
Click the New button and enter the expense entry details into the form.
Tip
Pressing the <F9> key in any field will duplicate the value for that field based on the value used in the previous expense entry. Fields may be set to always duplicate automatically by selecting auto-duplicate options (found by clicking Tools > Preferences from the toolbar in the Expense Entry dialog box).
-
Add attachments to the expense, using either of the following options, as desired:
- Click the Add File button to attach an existing file to the expense. Any existing attachments can be opened in their native software program by clicking them in the Attachment(s) text box.
- Click the Scan button to scan a hard copy version of the desired attachment to a file, which is then attached to the expense. For more information on scanning, refer to your scanner's documentation.
Once an attachment is added and the corresponding expense is posted, you can only view the attachment. It can no longer be edited.
Note
Attachments can be removed at any time, as long as the entry hasn't been posted. If posted, but not billed, you can remove the attachment using an adjustment batch. To delete an attachment, simply click it in the Attachment(s) text box, and press the DELETE key on your keyboard.
For more information about attachments, including information about supported formats, see Using Attachments.
-
Save the expense batch using any of the options below:
- Click the Save icon on the toolbar.
- Select Form > Save from the menu.
- keystroke command CTRL + S.
- Click the back one level icon; Juris will prompt to save before exiting the screen.
Note
Normal batches must be Posted before they are complete. See Expense Entries Advanced Topics for details.