Auto select checks
To automatically select checks to post, preview, or print:
- Select Transactions > Checks from the menu bar.
-
Select Form > New > Check Printing from the toolbar to open a new Checks batch.

-
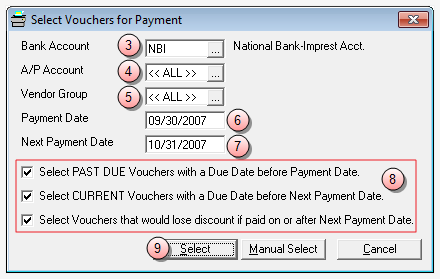
In the Bank Account box, type the account code of the bank from which checks are to be drawn (or click the ellipses button to select it from a listing).
Note
A bank account code is required.
- (Optional) In the A/P Account box, type a specific A/P Account code to narrow the selection to a particular A/P Account (or click the ellipses button to select it from a listing).
- (Optional) In the Vendor Group box, type a specific vendor group to narrow the selection to a particular vendor group (or click the ellipses button to select it from a listing).
- In the Payment Date box, type the payment date or accept the default.
- In the Next Payment Date box, type the next payment date in your accounting cycle or accept the default.
-
Check each option that applies the vouchers you want to select:
- Select PAST DUE for vouchers with a due date that is prior to the Payment Date entered in step 6 above.
- Select CURRENT for vouchers with a due date that precedes the Next Payment Date entered in step 7 above.
-
Select Vouchers that would lose discount if paid on or after Next Payment Date if you want to select all vouchers on which discounts would be lost.
-
Click the Select button.
The Checks window populates with all positive and negative vouchers that meet your selection criteria.
Note
Additional vouchers can be added manually and those you do not want to print or post can be removed. For instructions see the Add or remove a voucher topic for more details.
- Once checks are selected, you are ready to preview, print and/or post the checks. For specific instructions see the Printing/posting
checks topic.